今天来扒一扒Spring在启动过程中核心的12个步骤
前言
Spring启动时候整个入口是这么一个方法
AbstractApplicationContext#refresh

总共有12个方法,也就是启动时的核心步骤
AbstractApplicationContext有众多实现,这里我选择SpringBoot Web应用默认的实现来讲
AnnotationConfigServletWebServerApplicationContext
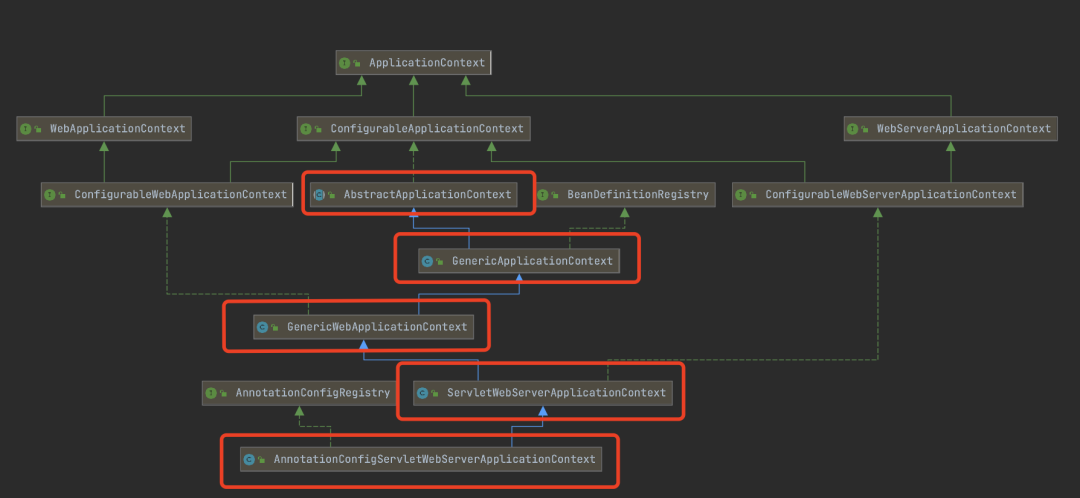
AnnotationConfigServletWebServerApplicationContext类图
对应的SpringBoot版本为 2.2.5.RELEASE
高版本refresh方法会多一些日志相关的代码,这里为了方便讲解,就使用这个版本
所以后面本文提到的所有子类的方法实现、重写都是指AnnotationConfigServletWebServerApplicationContext及其父类
prepareRefresh
prepareRefresh整个刷新的一个步骤,这个步骤是做启动的一个准备操作

ApplicationContext刚创建出来,什么也没有,所以需要做一些准备
首先是做一些状态位的变更,表明开始启动了或者刷新了
后面一行
initPropertySources
initPropertySources是一个模板方法,本身是一个空实现,是给子类用的
我们的这个子类就重写了initPropertySources方法
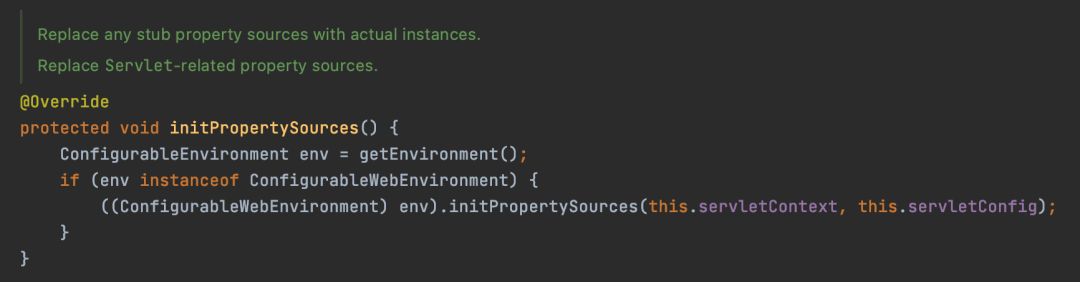
会将Servlet相关的配置加入到Environment中,这样我们就能从Environment中获取到Servlet相关的配置了
再后面一行
getEnvironment().validateRequiredProperties()
这行代码就是校验一些必要的配置属性,我们可以通过ConfigurableEnvironment来设置哪些属性是必要的,默认是没有必要的
所以prepareRefresh就是做了一些前置操作,准备好一些属性配置相关的东西,后面的其它环节,比如说生成Bean时可能需要用到这些配置
obtainFreshBeanFactory
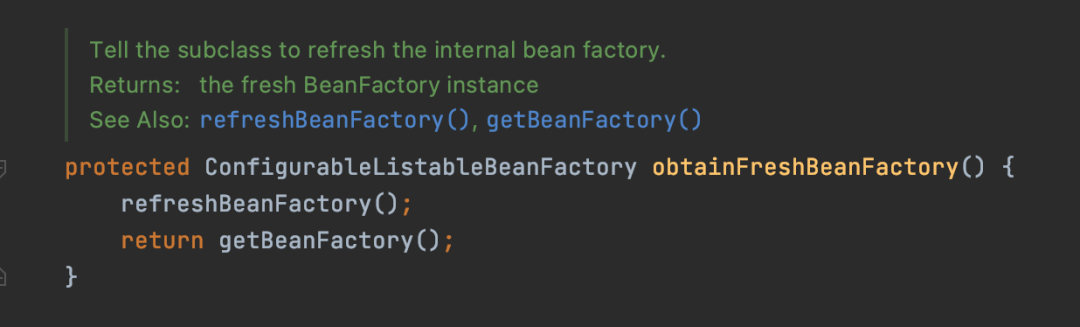
这一步骤是刷新BeanFactory并且获取BeanFactory
refreshBeanFactory() 和 getBeanFactory() 都是抽象方法,由子类来实现的

而子类的实现其实很简单,就是给beanFactory设置一个id和返回beanFactory
beanFactory就是下面这个玩意

并且创建对象的ApplicationContext对象的时候就创建了,类型为
DefaultListableBeanFactory
所以从这就可以看出来,虽然说BeanFactory是一个接口,有非常多的实现
但是实际情况下,真正使用的就是DefaultListableBeanFactory
并且DefaultListableBeanFactory其实算是BeanFactory唯一真正的实现
除此之外,还可以得出一个结论,ApplicationContext中有一个BeanFactory(DefaultListableBeanFactory)

prepareBeanFactory
上一步骤获取到了BeanFactory,但是这个BeanFactory仅仅就是刚刚new出来的,什么也没有
所以当前步骤就是对BeanFactory做一些配置工作
前三行代码

先给BeanFactory设置了一个ClassLoader,因为BeanFactory是用来创建Bean,需要加载Bean class对象
然后设置了一个BeanExpressionResolver,这个是用来解析SpEL表达式的
然后添加了一个PropertyEditorRegistrar,也就是
ResourceEditorRegistrar
这个的作用就是为BeanFactory添加一堆跟资源相关的PropertyEditor
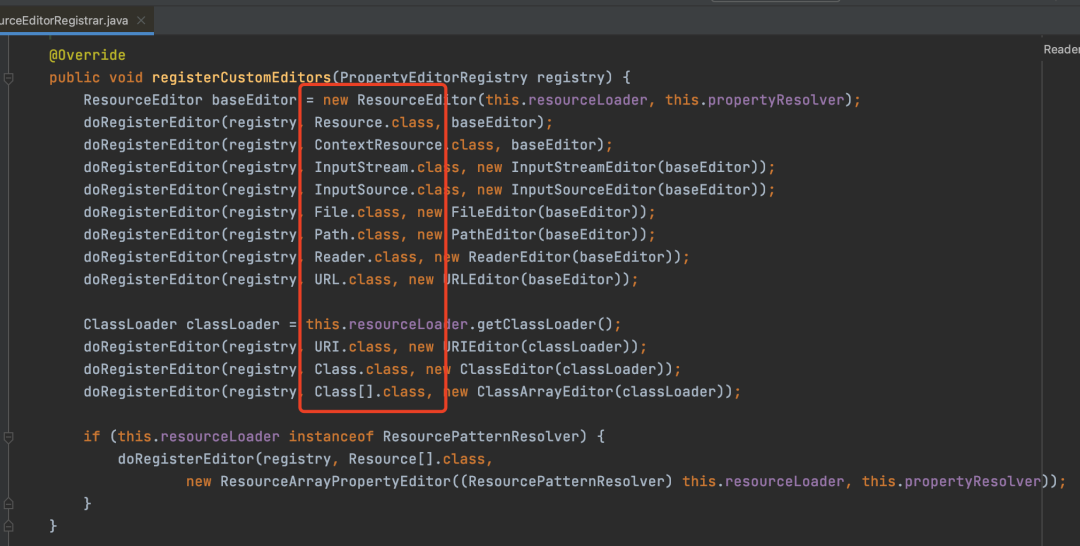
ResourceEditorRegistrar核心实现方法
PropertyEditor之前说过,就是进行类型转换的,将一个字符串转成对应的类型
接下来这几行
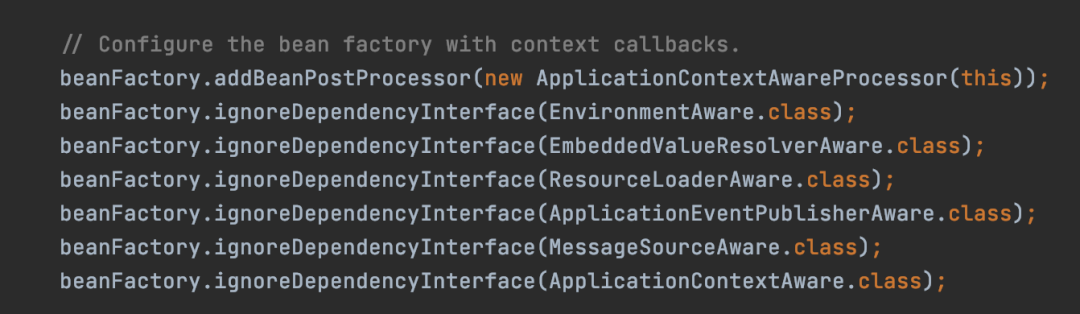
这里主要是添加了一个BeanPostProcessor,也就是
ApplicationContextAwareProcessor
BeanPostProcessor我们都知道会在Bean的生命周期阶段进行回调,是Bean的生命周期一个核心的环节
ApplicationContextAwareProcessor这个是用来处理Bean生命周期中的Aware回调有关
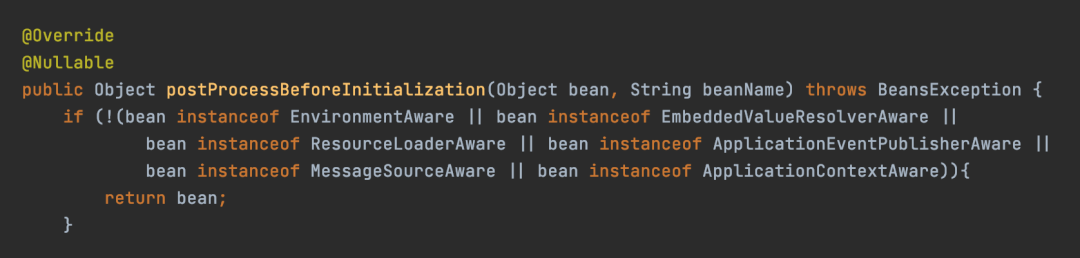
当你的Bean实现这些接口的时候,在创建的时候Spring会回调这些接口,传入对应的对象
而后面的这行代码
beanFactory.ignoreDependencyInterface(EnvironmentAware.class);
意思是说,如果你的Bean想注入一个EnvironmentAware对象
@Resource
private EnvironmentAware environmentAware;
这是不允许的
因为很简单,注入一个EnvironmentAware对象,没有实际的意义
后面的其它几行代码也都是这个意思
再接下来这几行

这跟上面的ignoreDependencyInterface作用相反
他是来设置依赖注入时Bean的类型所对应的对象
比如说这行代码
beanFactory.registerResolvableDependency(BeanFactory.class, beanFactory);
这行代码的意思就是当你需要注入一个Bean类型为BeanFactory.class类型的时候
@Resource
private BeanFactory beanFactory;
那么实际注入的就是方法第二个参数beanFactory,也就是上面获取的DefaultListableBeanFactory对象
同理,注入ResourceLoader、ApplicationEventPublisher、ApplicationContext时,其实注入的对象都是this,也就是当前的ApplicationContext对象
再再接下来这几行
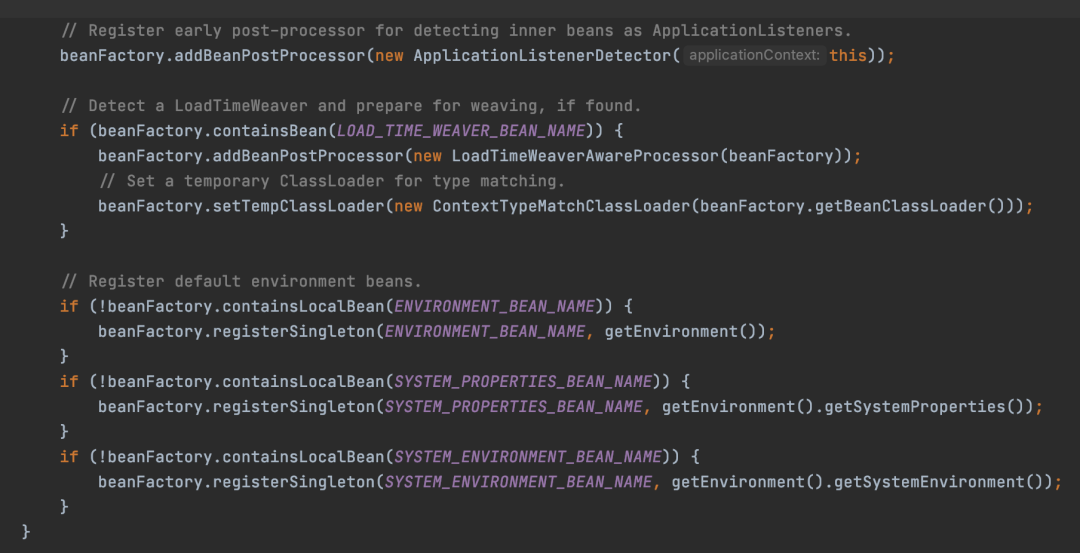
最开始又添加了一个BeanPostProcessor
ApplicationListenerDetector
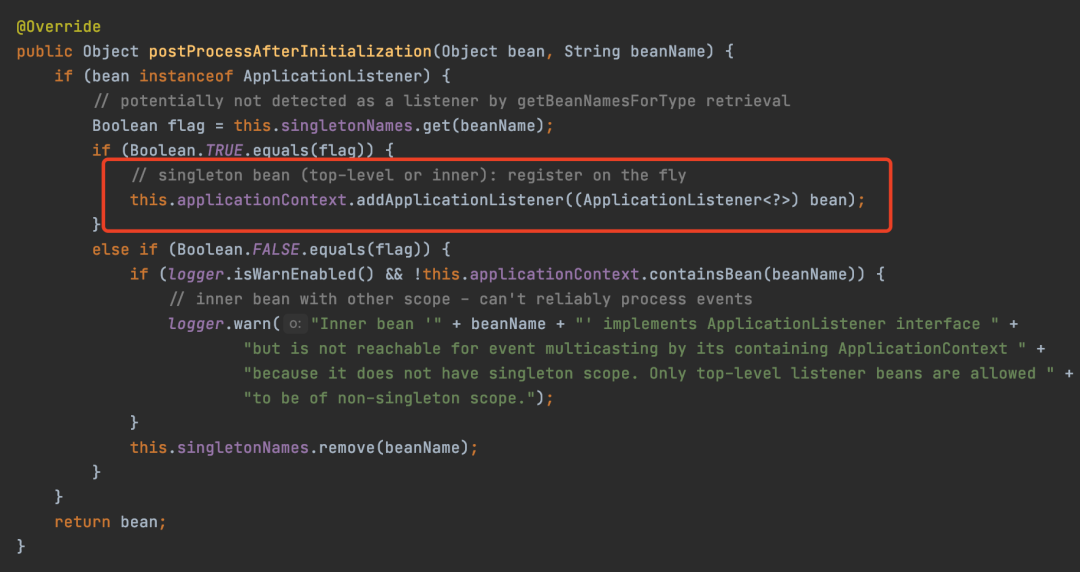
这个BeanPostProcessor是跟ApplicationListener有关
他是将单例的ApplicationListener给添加到ApplicationContext中
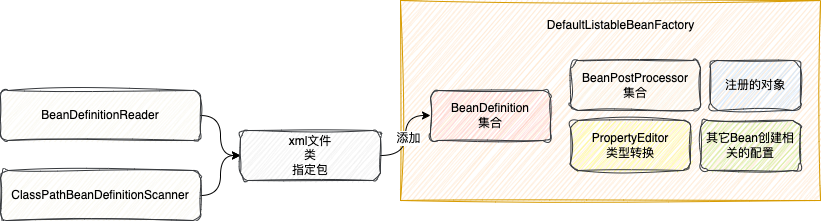
再后面就是往BeanFactory里面添加一些跟配置属性相关的单例对象,如果有哪里用到,就可以从BeanFactory中获取到了
prepareBeanFactory就完了
正如方法名字的含义一样,就是对BeanFactory做一些配置相关的东西
比如添加一些BeanPostProcessor,注册一些PropertyEditor
为Bean的生成做准备操作
最后画张图来总结一下这个方法的作用
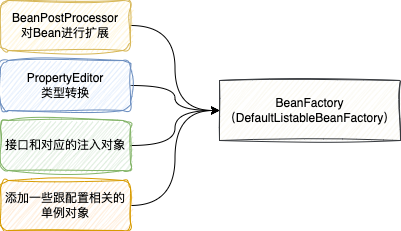
此时BeanFactory状态就是这样的
postProcessBeanFactory
这个方法是一个模板方法
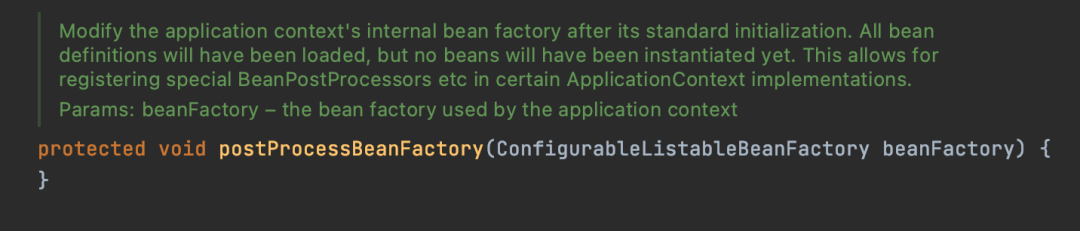
本身是空实现,是交给子类来扩展,子类可以根据不同的特性再对BeanFactory进行一些准备工作
比如我们用的这个Web实现就重写了这个方法,对BeanFactory设置一些Web相关的配置
AnnotationConfigServletWebServerApplicationContext#postProcessBeanFactory
首先调用父类ServletWebServerApplicationContext的postProcessBeanFactory
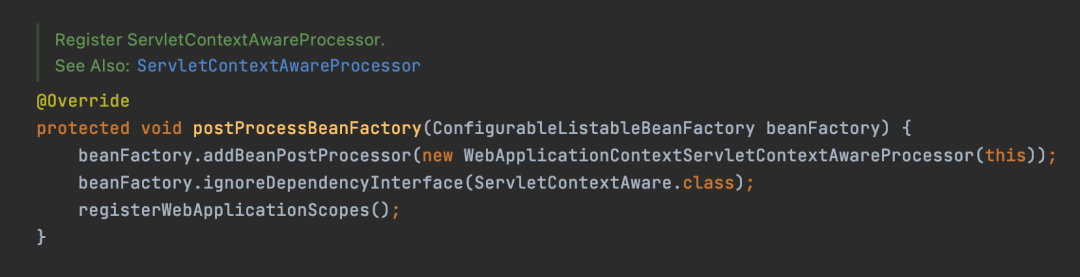
前两行代码跟之前说的一样,也是添加Aware接口的回调对应的BeanPostProcessor,只不过这个Aware是跟Servlet相关的东西
接下来调用registerWebApplicationScopes方法,最终会调到下面这个方法
WebApplicationContextUtils#registerWebApplicationScopes
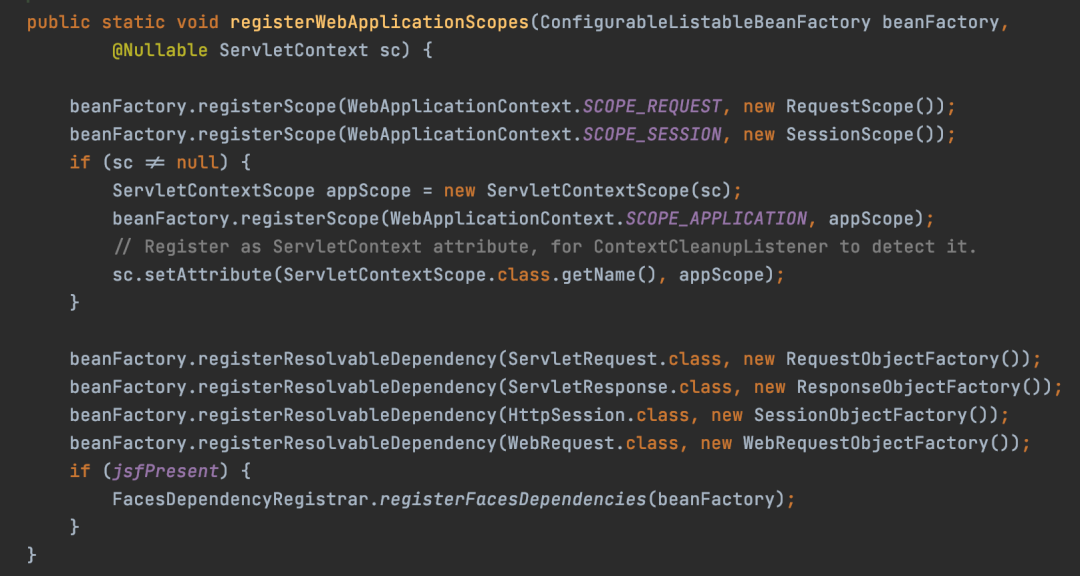
这个方法干了两件事
第一件事就是注册一下Bean在Web环境下的作用域request、session,八股文中的东西
第二个就是注册一些依赖注入时Bean类型和对应的对象,这在日常开发中还是有用的
比如可以直接注入一个ServletRequest
@Resource
private ServletRequest servletRequest;
所以,父类的实现主要还是对BeanFactory进行一些配置,只不过配置的主要是跟Web环境相关的东西
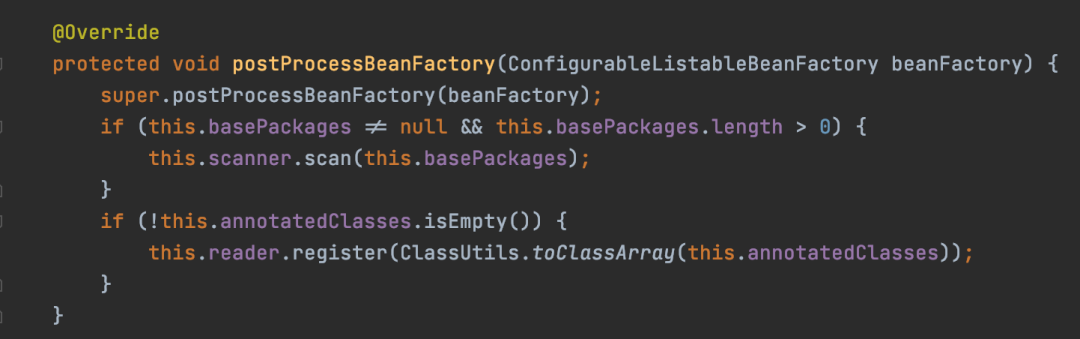
现在来看看AnnotationConfigServletWebServerApplicationContext自身的实现
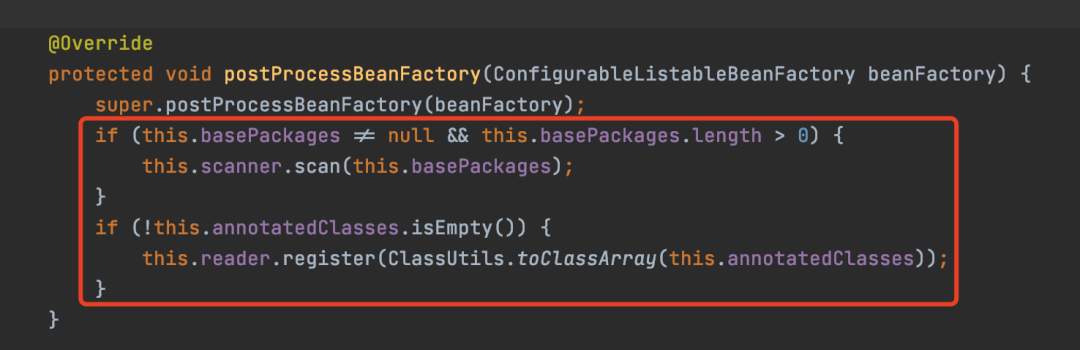
核心代码就是这两行
this.scanner.scan(this.basePackages);
this.reader.register(ClassUtils.toClassArray(this.annotatedClasses));
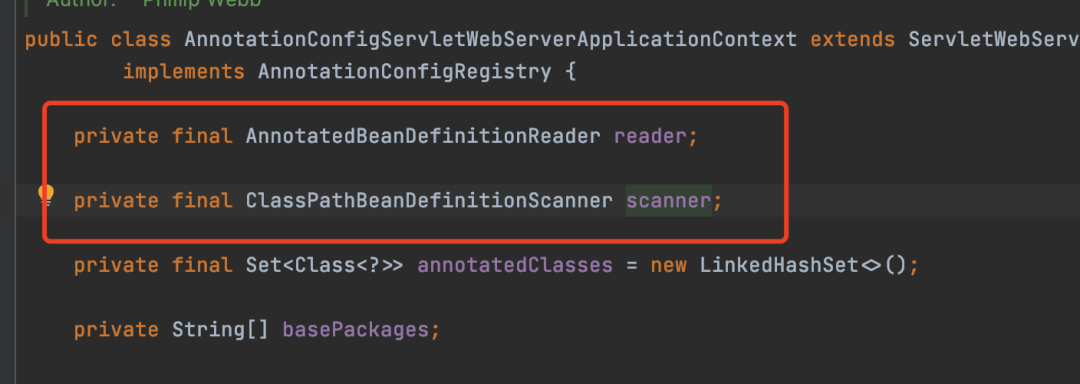
scanner和reader就是下面这两个玩意
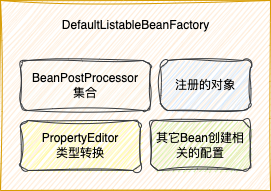
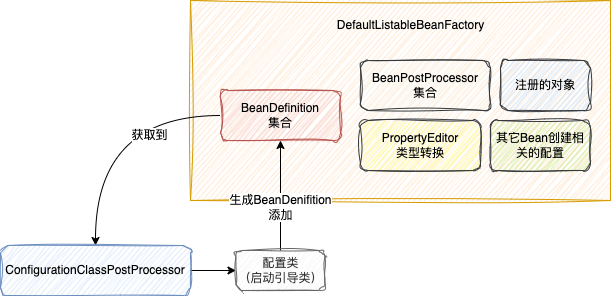
也就是说,如果这些配置都不是空的话,那么此时就会扫描对应的包的下Bean,生成对应的BeanDenifition,再注册到DefaultListableBeanFactory
至于为什么会存到DefaultListableBeanFactory中,可以看看之前的文章
此时BeanFactory大概是这么一个状态
除此之外,还有一个贼重要的事
AnnotationConfigServletWebServerApplicationContext这个ApplicationContext创建时会去创建AnnotatedBeanDefinitionReader
而AnnotatedBeanDefinitionReader的构造方法最终会调用这么一行代码
AnnotationConfigUtils#registerAnnotationConfigProcessors(BeanDefinitionRegistry registry)
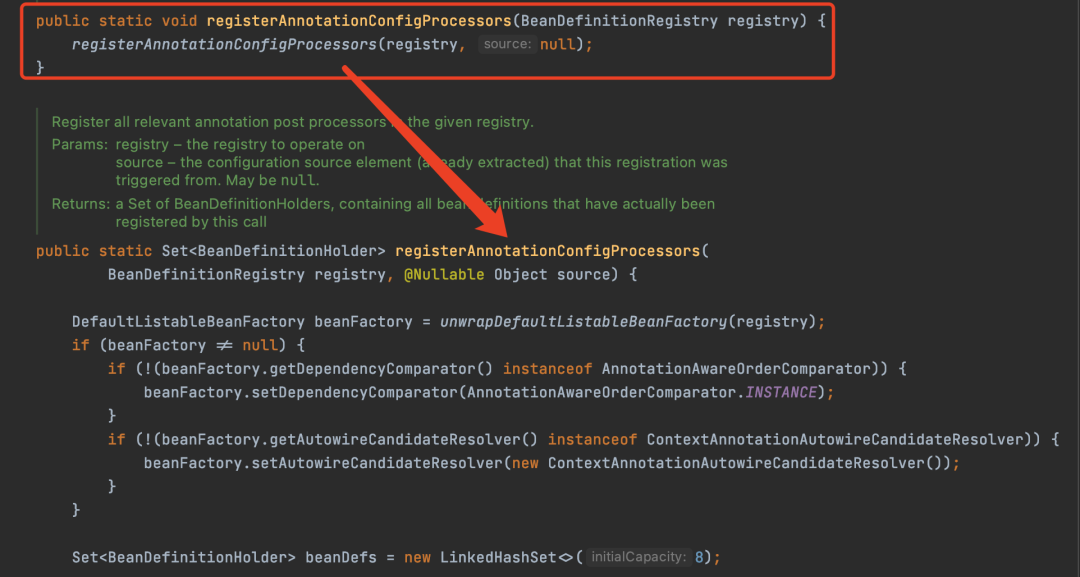
这个方法非常重要,他会去注册一些BeanDefinition到BeanFactory中,这里我称为Spring内部的Bean
这里我说几个常见和重要的
-
ConfigurationClassPostProcessor:这个是用来处理配置类的,非常重要,记住这个类,后面有大用 -
AutowiredAnnotationBeanPostProcessor:处理@Autowired、@Value注解 -
CommonAnnotationBeanPostProcessor:处理@Resource、@PostConstruct等注解
所以除了扫描出来的一些Bean对应的BeanDefinition,还有一些Spring内部的Bean会注册到BeanFactory中
此时BeanFactory的状态就如下图所示
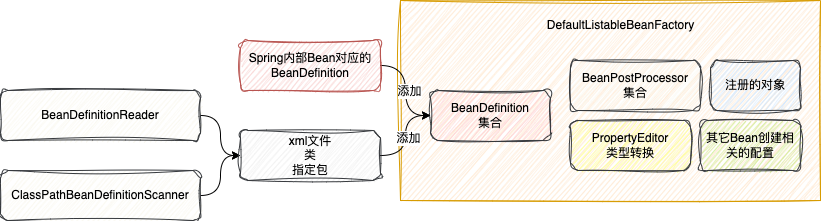
不过,在SpringBoot默认情况下,不会指定包和配置类,也就不会扫描文件,生成BeanDefinition
但是内部创建的BeanDefinition依然存在,并且在ApplicationContext创建的时候就注册到BeanFactory中了
所以总结来说,postProcessBeanFactory这个方法是交给子类对BeanFactory做一些准备操作,并且可能会扫描Bean
invokeBeanFactoryPostProcessors
从这个方法的名字可以看出,是调用BeanFactoryPostProcessor,这个步骤非常重要,而且过程有点绕
前置知识:BeanFactoryPostProcessor及其子接口
BeanFactoryPostProcessor是一个接口,有一个方法,方法参数就是BeanFactory
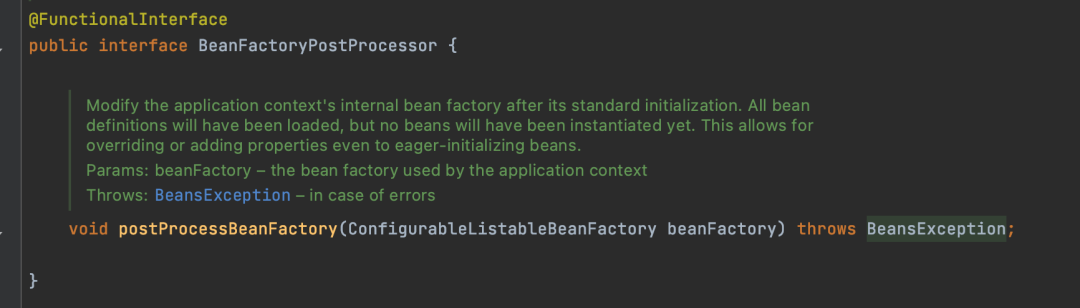
通过这个方法就可以拿到BeanFactory,然后对BeanFactory做一些自己的调整
比如说,你想关闭循环依赖,你就可以实现这个接口,然后进行调整
他还有一个子接口BeanDefinitionRegistryPostProcessor
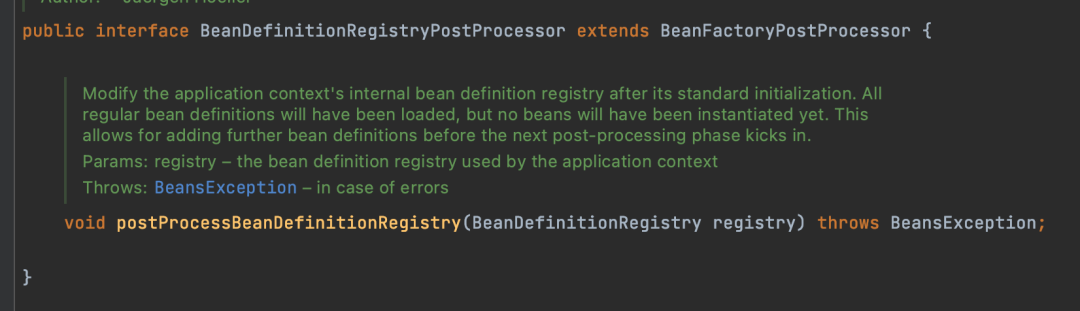
这个接口是对BeanDefinitionRegistry进行调整,BeanDefinitionRegistry就是存BeanDefinition的地方,真实的实现就是DefaultListableBeanFactory
所以BeanDefinitionRegistryPostProcessor的作用就是往BeanDefinitionRegistry(DefaultListableBeanFactory)中添加BeanDefinition的
再看invokeBeanFactoryPostProcessors
有了这两个前置知识之后,我们来看看invokeBeanFactoryPostProcessors方法的实现
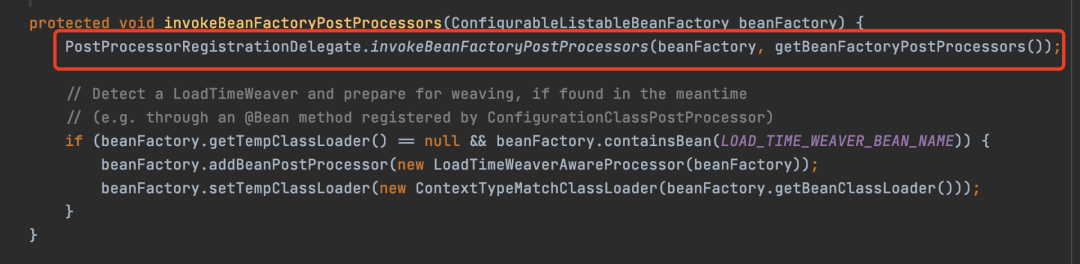
这个方法最终会调用下面方法来真正的处理
PostProcessorRegistrationDelegate.invokeBeanFactoryPostProcessors;
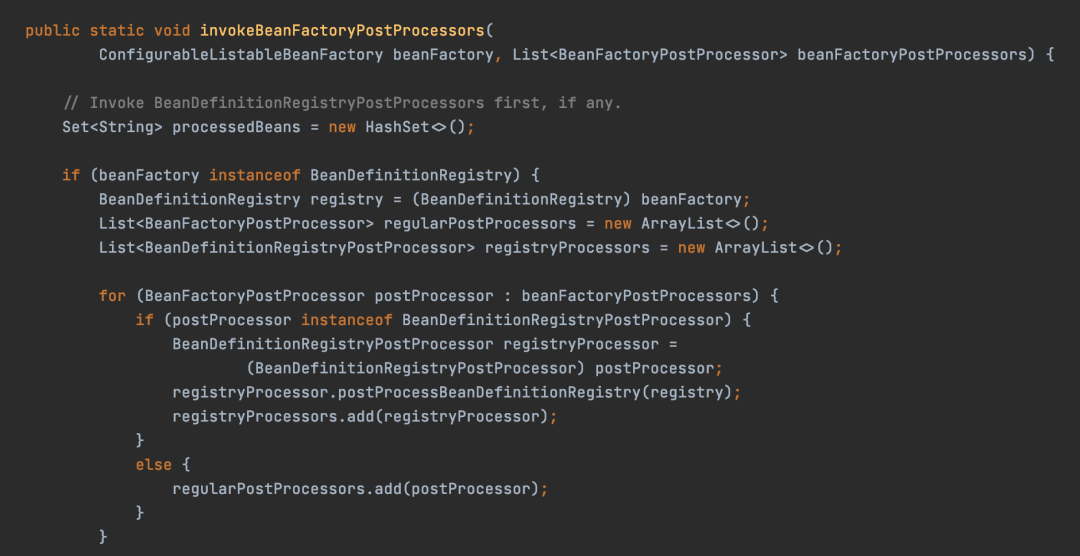
这个方法比较长,大致分为两件事
-
调用所有的BeanDefinitionRegistryPostProcessor,解析配置类,注册BeanDefinition到DefaultListableBeanFactory中 -
从BeanFactory中获取所有的BeanFactoryPostProcessor进行调用,完成对BeanFactory一些其它的扩展
调用BeanDefinitionRegistryPostProcessor
首先第一步,先从BeanFactory中获取到所有的BeanDefinitionRegistryPostProcessor对象,调用它的postProcessBeanDefinitionRegistry方法
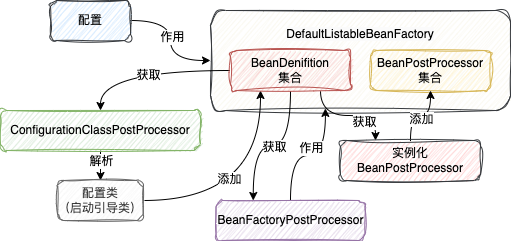
还记得上一节在说注册Spring内部的Bean时特地强调的一个类ConfigurationClassPostProcessor不?
他就实现了BeanDefinitionRegistryPostProcessor接口
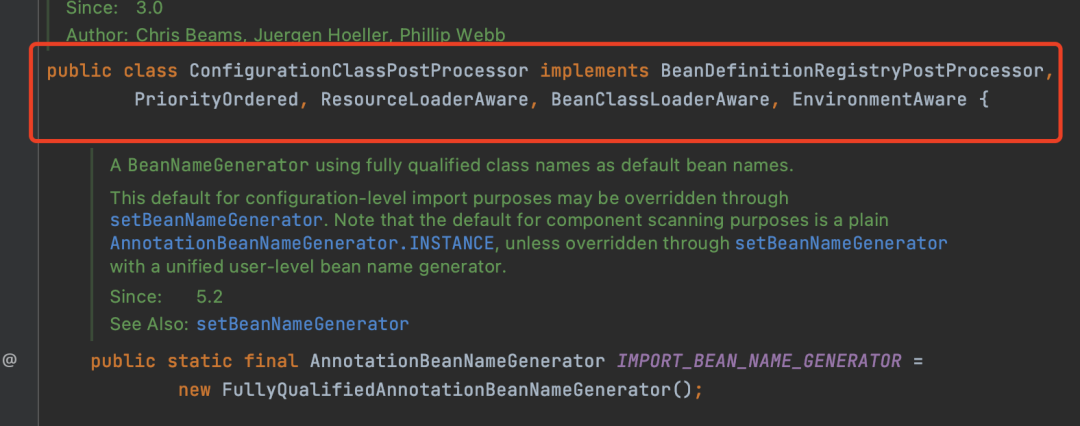
所以此时获取到的就是ConfigurationClassPostProcessor

获取ConfigurationClassPostProcessor的时候会走Bean的生命周期,也就是会回调前面添加的BeansPostProcessor,但是也没几个
之后会调用他的postProcessBeanDefinitionRegistry方法,来处理此时BeanFactory中的配置类
配置类从哪来,前面一直没提到过
但是看一下ApplicationContext是如何使用的就知道了
比如说,下面这个demo
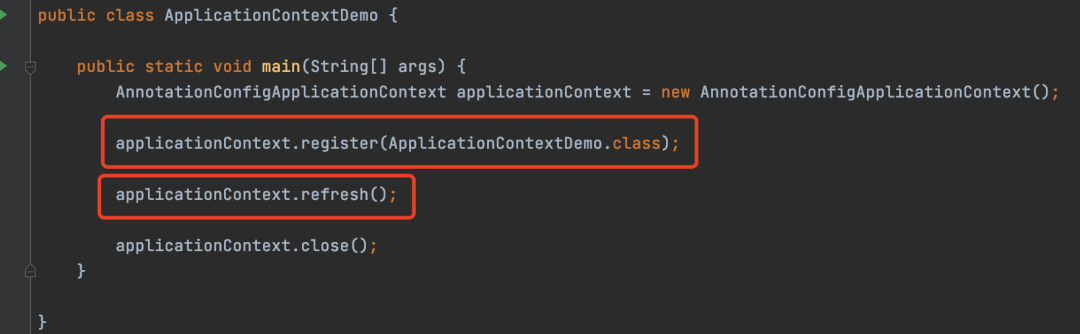
在创建一个ApplicationContext之后,在注册一个Bean之后再refresh
此时这个注册的Bean就是配置类。
如果你不注册,那是真没有配置类,此时也就没什么意义了。
所以,ApplicationContext一定会有一个配置类,不然没有意义。
在SpringBoot条件下,SpringBoot在启动时就会将启动引导类当做配置类给扔到BeanFactory中。
所以ConfigurationClassPostProcessor最开始处理的时候,就是处理启动引导类
我们可以在ConfigurationClassPostProcessor方法实现上打个断点验证一下
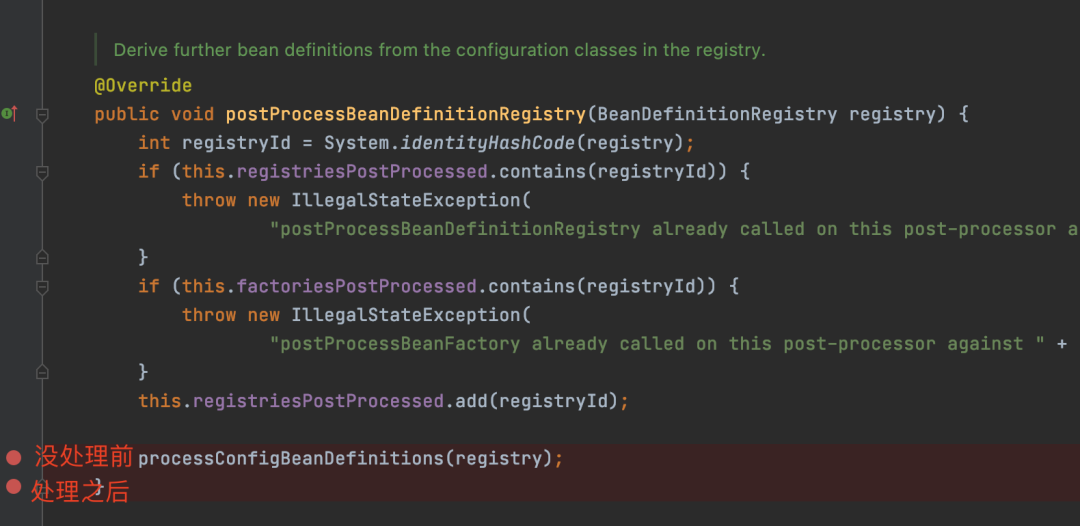
在处理之前可以看见,除了几个spring内部的BeanDefinition之外,还有一个myApplication,就是我的启动引导类
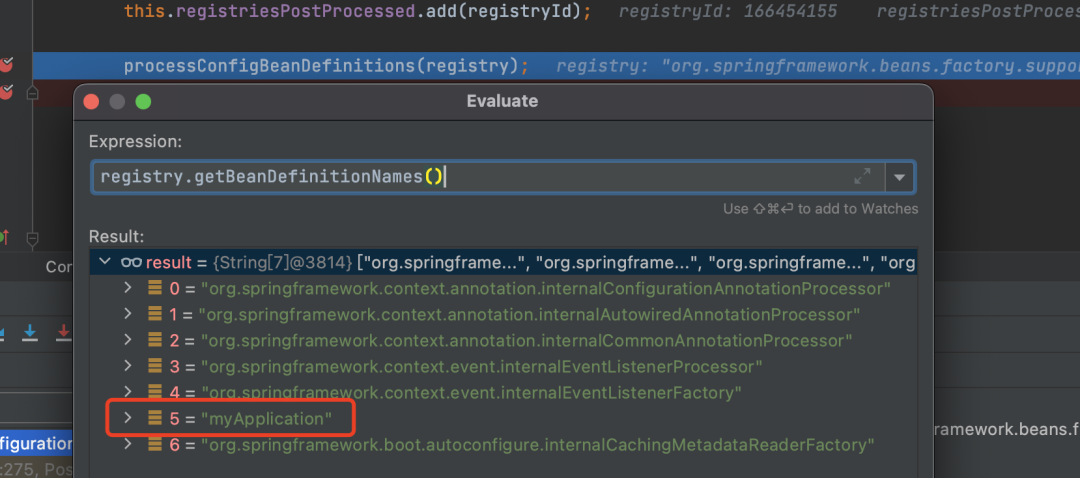
处理的时候它会解析启动引导类的注解,进行自动装配,扫描你写的代码的操作,之后生成BeanDefinition
当处理完成之后我们再看看,DefaultListableBeanFactory有了非常多的BeanDefinition了

所以到第一步就完成了,此时BeanFactory就加载了很多Bean
接下来,由于又新注册了很多BeanDefinition,而这些里面就有可能有BeanDefinitionRegistryPostProcessor接口的实现
所以之后会重复从BeanFactory中获取BeanDefinitionRegistryPostProcessor,调用postProcessBeanDefinitionRegistry
一直会循环下去,直到所有的BeanDefinitionRegistryPostProcessor都被调用为止
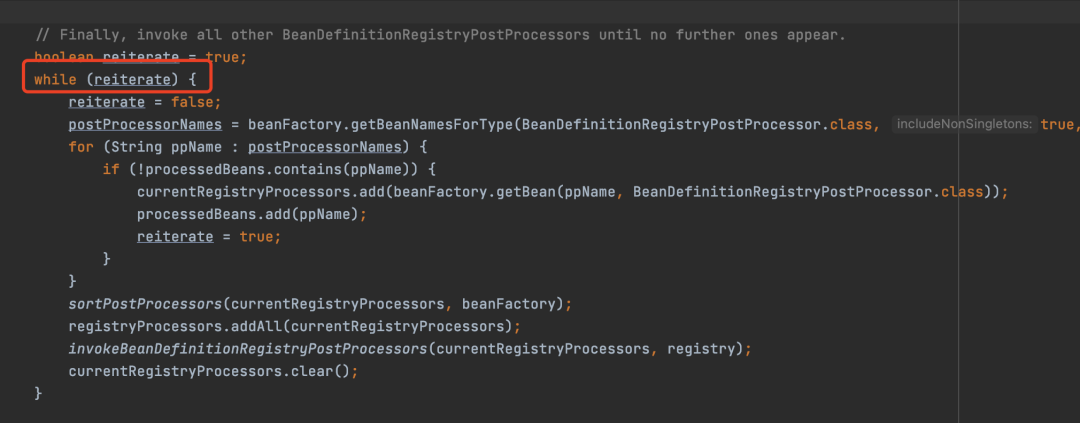
由于BeanDefinitionRegistryPostProcessor继承BeanFactoryPostProcessor
所以之后也会调用BeanDefinitionRegistryPostProcessor的postProcessBeanFactory方法
调用BeanFactoryPostProcessor
当调完所有的BeanDefinitionRegistryPostProcessor实现方法
之后就会从BeanFactory获取所有的BeanFactoryPostProcessor(除了BeanDefinitionRegistryPostProcessor实现之外),调用postProcessBeanFactory方法
此时就可以通过BeanFactoryPostProcessor再次对BeanFactory进制扩展
总的来说,这一步骤的核心作用就是完成对BeanFactory自定义扩展,但是由于BeanFactoryPostProcessor都是Bean,所以要第一步先加载Bean,之后才能通过BeanFactoryPostProcessor来扩展
一张图来总结上面主要干的事

这里简化了一些前面提到东西
registerBeanPostProcessors
上面一个步骤已经完成了Bean的扫描和对BeanFactory的扩展
这一节通过方法名就可以看出,是跟BeanPostProcessor相关

不过在这个方法执行之前,我们先来看看此时BeanFactory中已经有了哪些BeanPostProcessor
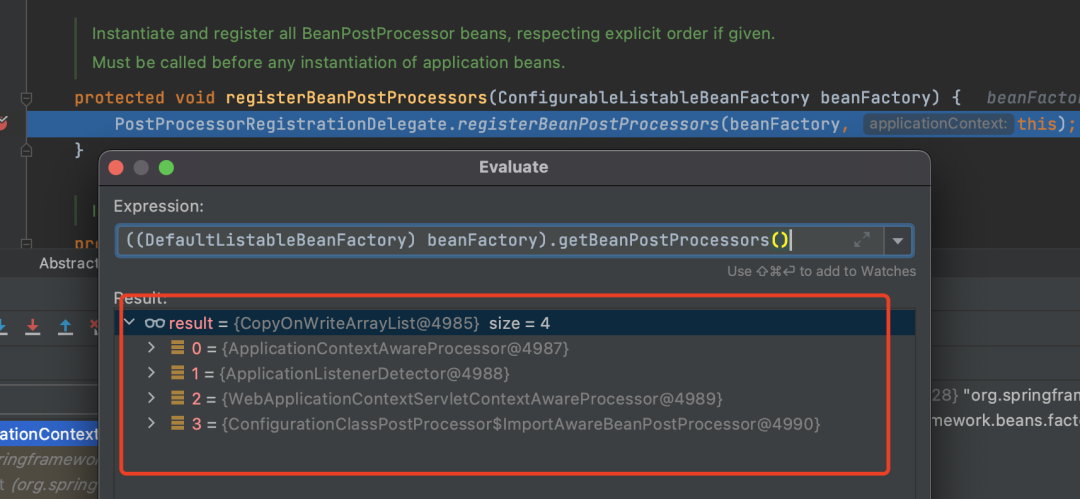
此时只有4个,前3个前面都提到过,但是像我们熟知的处理@Autowired、@Resource注解的BeanPostProcessor都不在里面
所以这里就有一个非常重要的小细节
在当前这个步骤执行之前如果从BeanFactory中获取Bean的话,虽然会走Bean生命周期的整个过程,但是@Autowired、@Resource注解都不会生效,因为此时BeanFactory中还没有处理这些注解的BeanPostProcessor(CommonAnnotationBeanPostProcessor等)
什么意思呢,举个例子
比如上面一节,在当前步骤执行之前会从BeanFactory中获取BeanFactoryPostProcessor
假设现在你实现了BeanFactoryPostProcessor,想注入一个ApplicationContext对象
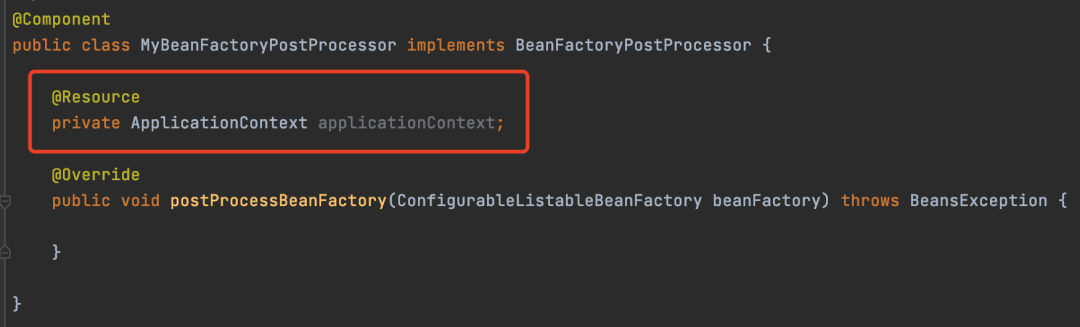
此时是注入不成功的,@Resource注解不会生效,就是这个意思。
这时只能通过ApplicationContextAware方式获取,因为有对应的BeanPostProcessor(ApplicationContextAwareProcessor)
接下来我们再来看看registerBeanPostProcessors实现
最终也是调用下面的方法
PostProcessorRegistrationDelegate#registerBeanPostProcessors
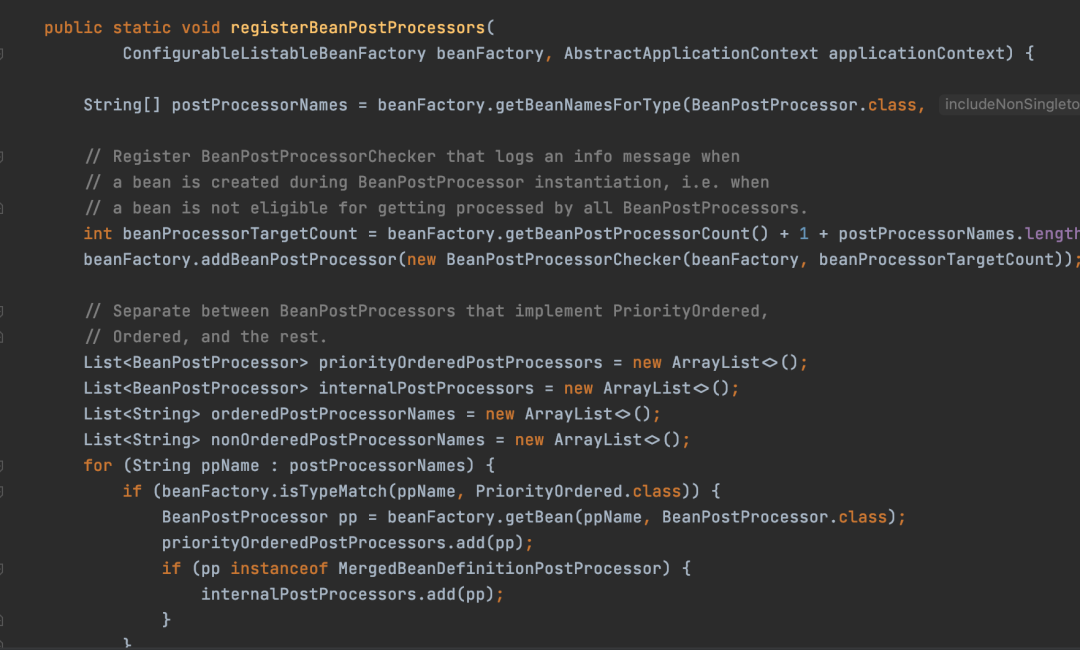
这个过程就没上面那个步骤复杂了
其实就是从BeanFactory中获取到所有的BeanPostProcessor,然后添加到BeanFactory中
不过值得注意的是,BeanPostProcessor创建会有优先级,优先级高的会先被创建和添加到BeanFactory中
到这一步其实BeanFactory就算是准备完成了,基本上跟创建Bean相关的前置操作几乎都完成了
最后再来张图总结一下这个方法干的事
initMessageSource
这个方法是处理国际化相关的操作
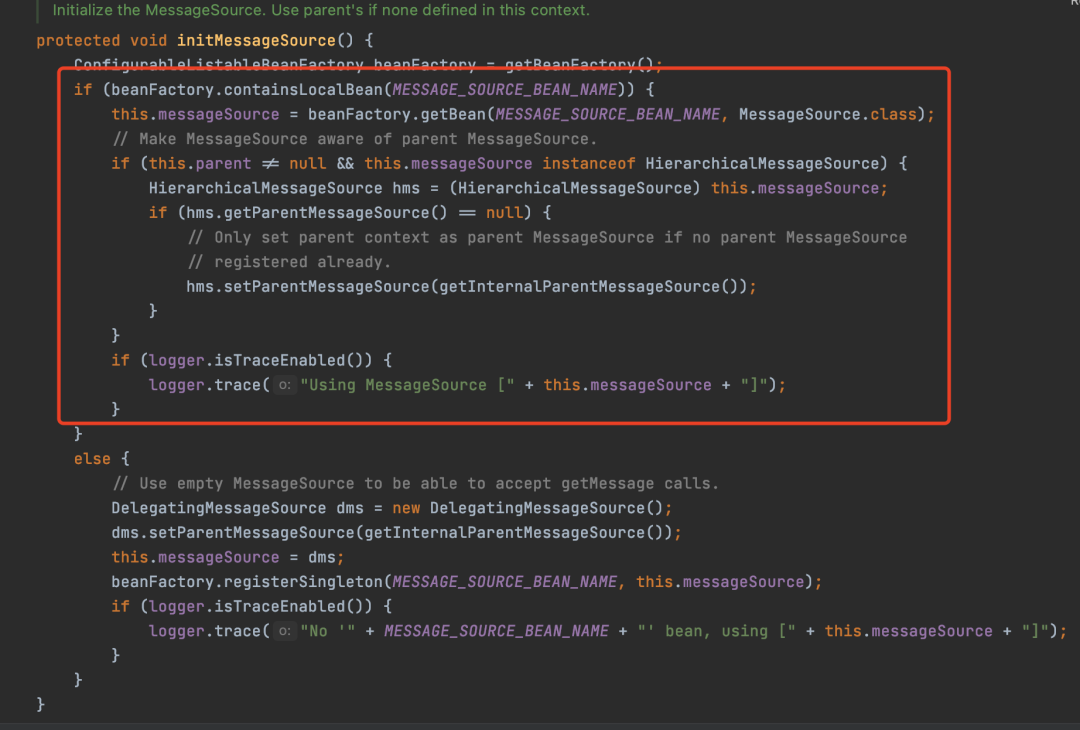
这个操作比较简单,就是从BeanFactory中看看有没有Bean名称为messageSource的Bean

有的话就使用这个MessageSource,没有的话就用默认的
不过SpringBoot项目下会自动装配一个MessageSource,所以此时容器中是有的
initApplicationEventMulticaster
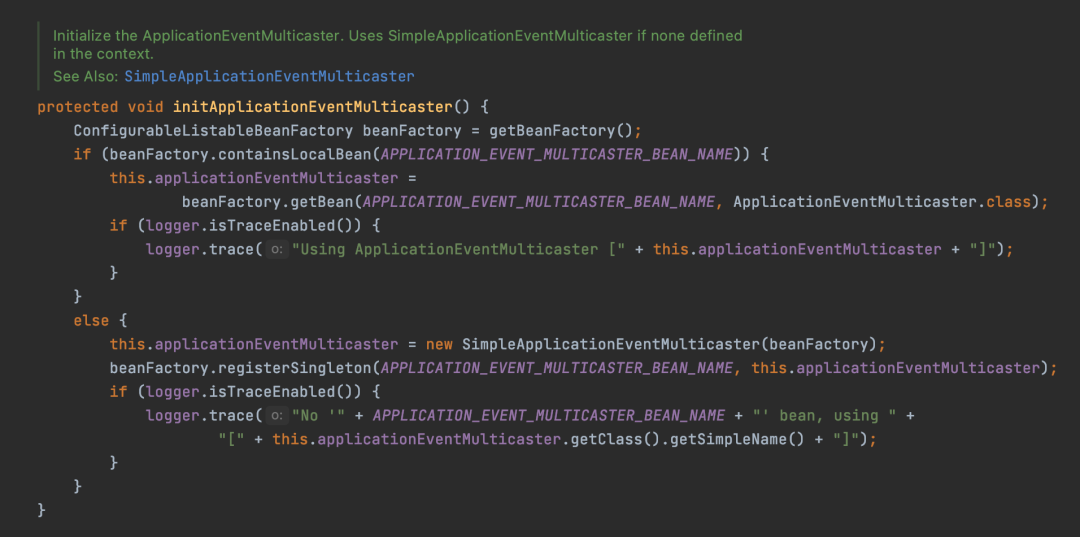
这个方法跟上面的差不多,也是从BeanFactory找有没有ApplicationEventMulticaster
有就用容器中的,没有就自己创建一个
ApplicationEventMulticaster是真正用来发布事件的,ApplicationEventPublisher最终也是调用他来发布事件
ApplicationEventMulticaster内部会缓存所有的监听器
当通过ApplicationEventMulticaster发布事件的时候,会去找到所有的监听器,然后调用
onRefresh
onRefresh也是一个模板方法,本身也是空实现
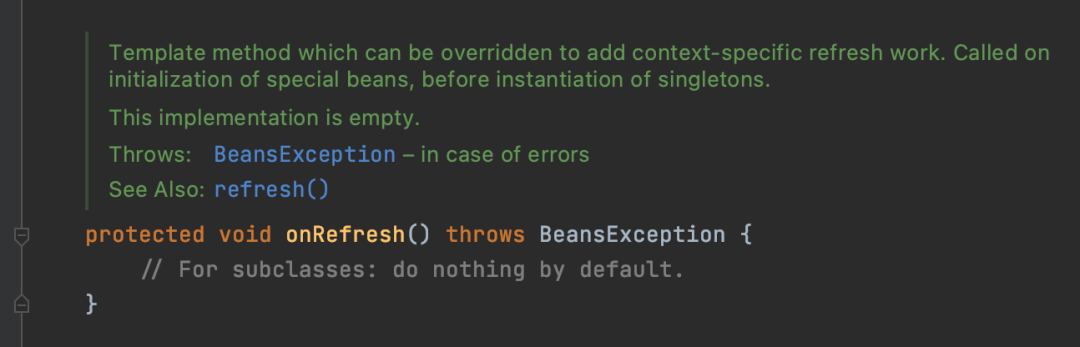
子类重写这个方法,会去创建一个Web服务器
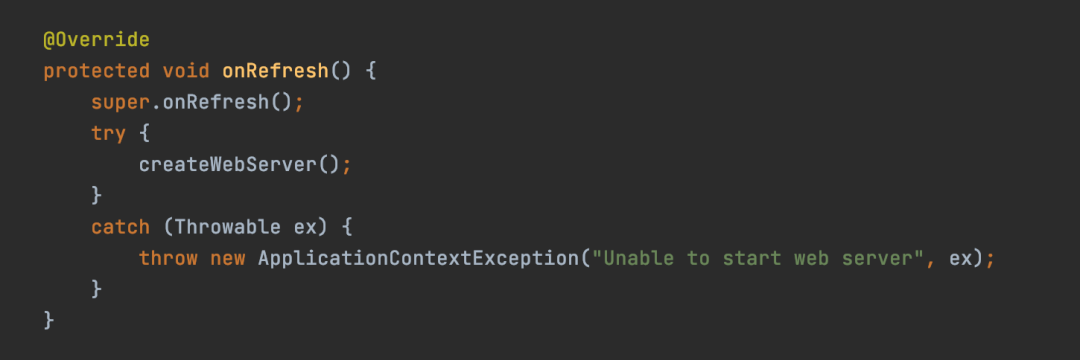
registerListeners

这个方法其实也比较简单,就是将监听器给添加到ApplicationEventMulticaster中
finishBeanFactoryInitialization
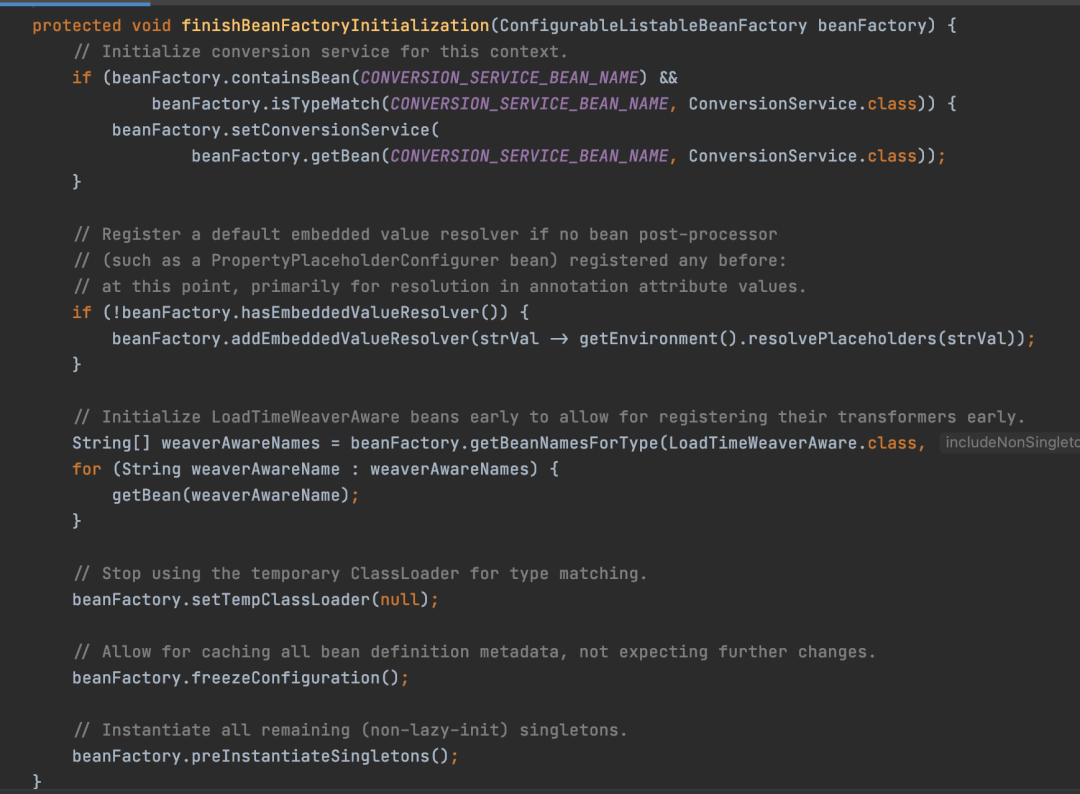
这个方法首先又是老套路,就是判断容器中有没有ConversionService
ConversionService也是用来做类型转换的,跟前面提到的PropertyEditor作用差不多
如果有,就把ConversionService设置到BeanFactory中
到这一步,BeanFactory才算真的准备完成。。。
之后其实干的事就不太重要了
但是最后一行比较重要
beanFactory.preInstantiateSingletons();
从方法的命名就可以看出,实例化所有的单例对象
因为对于BeanFactory的一些配置在前面都完成了,所以这里就可以来实例化所有的单例对象了
这个方法会做两件事
第一件事就是实例化所有的非懒加载的单例Bean
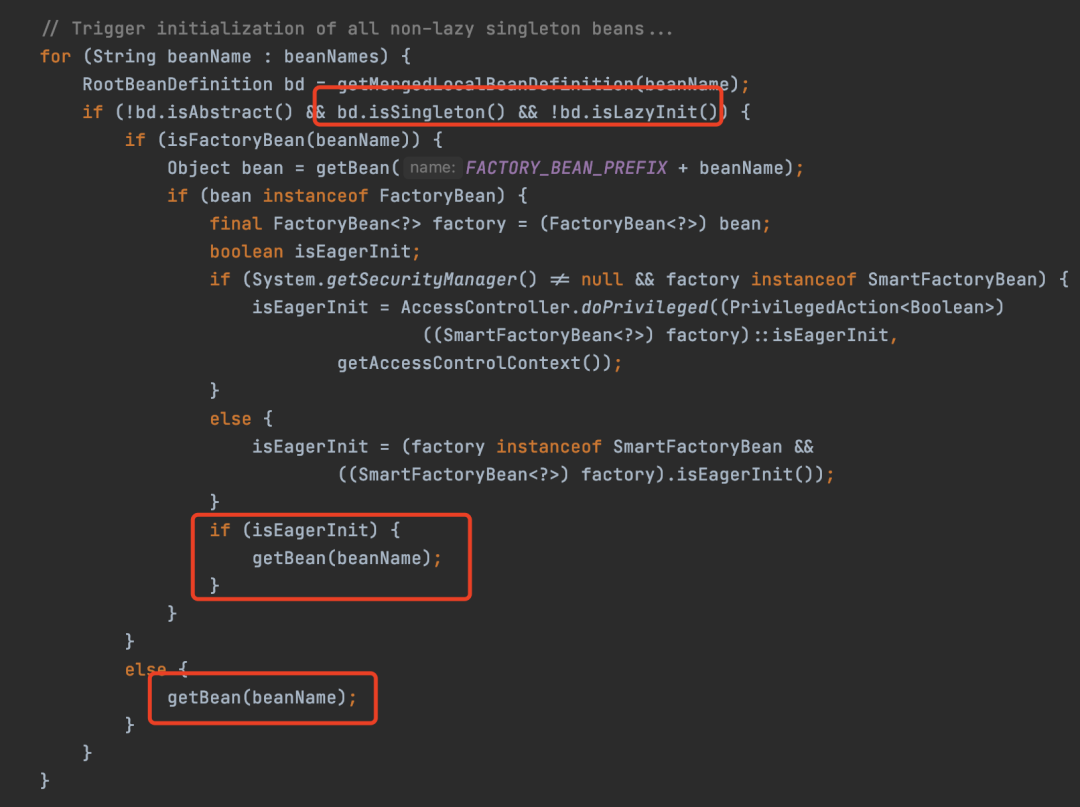
实际上就是通过getBean方法来的,因为获取Bean,不存在的时候就会创,会走Bean的生命周期
第二件事就是一旦单例Bean实现了SmartInitializingSingleton接口,就会调用SmartInitializingSingleton的afterSingletonsInstantiated方法

这个其实也算是Bean生命周期的一部分。
finishRefresh
这个方法是整个Spring容器刷新的最后一个方法

这个方法就是收尾的操作
清理一下缓存操作
之后就是初始化LifecycleProcessor
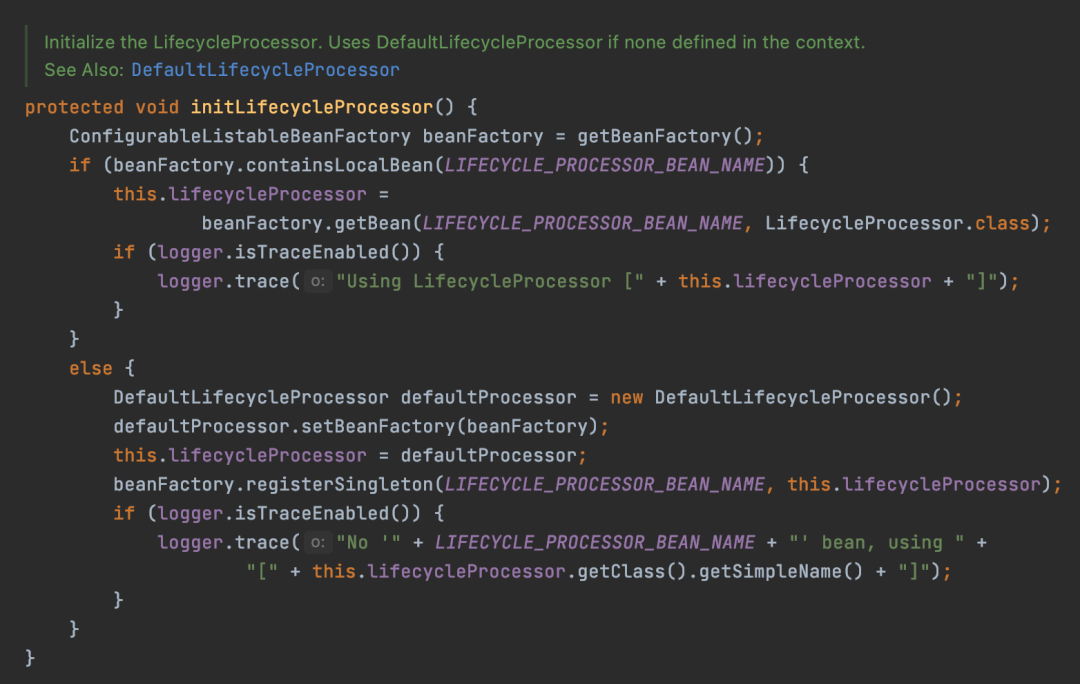
都是一样的套路,优先用BeanFactory中的
后面就会调用LifecycleProcessor#onRefresh方法
这个方法的作用就是,如果你的Bean实现了SmartLifecycle的接口,会调start的方法
随后就发布一个ContextRefreshedEvent事件,表明容器已经刷新完成了
在Web环境底下,这个finishRefresh方法被重写了
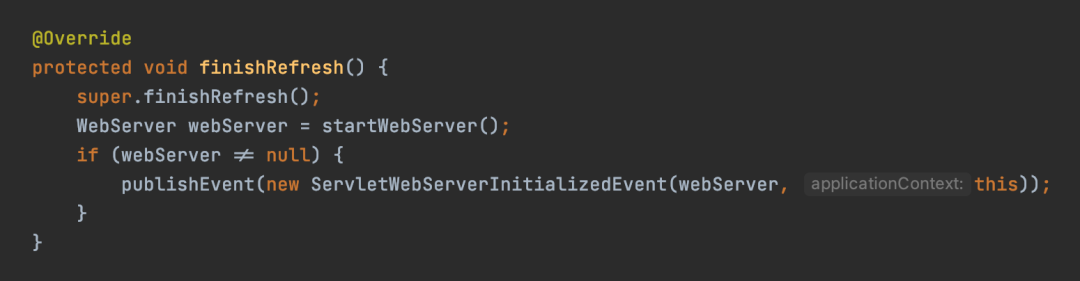
主要是多干了一件事,那就是启动Web服务器
并且会发布了一个ServletWebServerInitializedEvent事件
这个事件在SpringBoot中用的不多
但是在SpringCloud中却非常重要
在SpringCloud环境底下会有一个类监听这个事件
一旦监听到这个事件,SpringCloud就会将当前的服务的信息自动注册到注册中心上
这就是服务自动注册的原理
总结
这里再来简单回顾一下Spring启动大致的几个过程
最开始的准备操作,这部分就是准备一些配置属性相关的
之后连续好几个方法都是准备BeanFactory的,我把上面那张图拿过来
整个准备BeanFactory过程大致如下:
-
先配置BeanFactory -
通过ConfigurationClassPostProcessor加载Bean到BeanFactory中 -
从上一步加载的Bean中获取BeanFactoryPostProcessor,完成对BeanFactory做自定义处理 -
从上一步加载的Bean中获取BeanPostProcessor,添加到BeanFactory中
当这些步骤完成之后,BeanFactory跟Bean创建相关的配置几乎算是配置完成了
之后其实就是一些ApplicationContext内部的一些组价的初始化,比如MessageSource、ApplicationEventMulticaster等等
优先从BeanFactory中获取,没有再用默认的
到这ApplicationContext也算配置完成了,之后就可以实例化单例非懒加载的Bean了
再后面就是一些扫尾的操作,发布一个ContextRefreshedEvent事件,表明容器已经刷新完成了
这时Spring就就算是真正启动完成了。
·············· END ··············
0 条评论