定时任务在实际的开发中特别常见,比如电商平台 30 分钟后自动取消未支付的订单,以及凌晨的数据汇总和备份等,都需要借助定时任务来实现,那么我们本文就来看一下定时任务最简单的几种实现方式。
TOP 1:Timer
Timer 是 JDK 自带的定时任务执行类,无论任何项目都可以直接使用 Timer 来实现定时任务,所以 Timer 的优点就是使用方便,它的实现代码如下:
public class MyTimerTask {
    public static void main(String[] args) {
        // 定义一个任务
        TimerTask timerTask = new TimerTask() {
            @Override
            public void run() {
                System.out.println("Run timerTask:" + new Date());
            }
        };
        // 计时器
        Timer timer = new Timer();
        // 添加执行任务(延迟 1s 执行,每 3s 执行一次)
        timer.schedule(timerTask, 1000, 3000);
    }
}
程序执行结果如下:
Run timerTask:Mon Aug 17 21:29:25 CST 2020
Run timerTask:Mon Aug 17 21:29:28 CST 2020
Run timerTask:Mon Aug 17 21:29:31 CST 2020
Timer 缺点分析
Timer 类实现定时任务虽然方便,但在使用时需要注意以下问题。
问题 1:任务执行时间长影响其他任务
当一个任务的执行时间过长时,会影响其他任务的调度,如下代码所示:
public class MyTimerTask {
    public static void main(String[] args) {
        // 定义任务 1
        TimerTask timerTask = new TimerTask() {
            @Override
            public void run() {
                System.out.println("进入 timerTask 1:" + new Date());
                try {
                    // 休眠 5 秒
                    TimeUnit.SECONDS.sleep(5);
                } catch (InterruptedException e) {
                    e.printStackTrace();
                }
                System.out.println("Run timerTask 1:" + new Date());
            }
        };
        // 定义任务 2
        TimerTask timerTask2 = new TimerTask() {
            @Override
            public void run() {
                System.out.println("Run timerTask 2:" + new Date());
            }
        };
        // 计时器
        Timer timer = new Timer();
        // 添加执行任务(延迟 1s 执行,每 3s 执行一次)
        timer.schedule(timerTask, 1000, 3000);
        timer.schedule(timerTask2, 1000, 3000);
    }
}
程序执行结果如下:
进入 timerTask 1:Mon Aug 17 21:44:08 CST 2020
Run timerTask 1:Mon Aug 17 21:44:13 CST 2020
Run timerTask 2:Mon Aug 17 21:44:13 CST 2020
进入 timerTask 1:Mon Aug 17 21:44:13 CST 2020
Run timerTask 1:Mon Aug 17 21:44:18 CST 2020
进入 timerTask 1:Mon Aug 17 21:44:18 CST 2020
Run timerTask 1:Mon Aug 17 21:44:23 CST 2020
Run timerTask 2:Mon Aug 17 21:44:23 CST 2020
进入 timerTask 1:Mon Aug 17 21:44:23 CST 2020
从上述结果中可以看出,当任务 1 运行时间超过设定的间隔时间时,任务 2 也会延迟执行。 原本任务 1 和任务 2 的执行时间间隔都是 3s,但因为任务 1 执行了 5s,因此任务 2 的执行时间间隔也变成了 10s(和原定时间不符)。
问题 2:任务异常影响其他任务
使用 Timer 类实现定时任务时,当一个任务抛出异常,其他任务也会终止运行,如下代码所示:
public class MyTimerTask {
    public static void main(String[] args) {
        // 定义任务 1
        TimerTask timerTask = new TimerTask() {
            @Override
            public void run() {
                System.out.println("进入 timerTask 1:" + new Date());
                // 模拟异常
                int num = 8 / 0;
                System.out.println("Run timerTask 1:" + new Date());
            }
        };
        // 定义任务 2
        TimerTask timerTask2 = new TimerTask() {
            @Override
            public void run() {
                System.out.println("Run timerTask 2:" + new Date());
            }
        };
        // 计时器
        Timer timer = new Timer();
        // 添加执行任务(延迟 1s 执行,每 3s 执行一次)
        timer.schedule(timerTask, 1000, 3000);
        timer.schedule(timerTask2, 1000, 3000);
    }
}
程序执行结果如下:
进入 timerTask 1:Mon Aug 17 22:02:37 CST 2020
Exception in thread “Timer-0” java.lang.ArithmeticException: / by zero
at com.example.MyTimerTask$1.run(MyTimerTask.java:21)
at java.util.TimerThread.mainLoop(Timer.java:555)
at java.util.TimerThread.run(Timer.java:505)
Process finished with exit code 0
Timer 小结
Timer 类实现定时任务的优点是方便,因为它是 JDK 自定的定时任务,但缺点是任务如果执行时间太长或者是任务执行异常,会影响其他任务调度,所以在生产环境下建议谨慎使用。
TOP 2:ScheduledExecutorService
ScheduledExecutorService 也是 JDK 1.5 自带的 API,我们可以使用它来实现定时任务的功能,也就是说 ScheduledExecutorService 可以实现 Timer 类具备的所有功能,并且它可以解决了 Timer 类存在的所有问题。
ScheduledExecutorService 实现定时任务的代码示例如下:
public class MyScheduledExecutorService {
    public static void main(String[] args) {
        // 创建任务队列
        ScheduledExecutorService scheduledExecutorService =
                Executors.newScheduledThreadPool(10); // 10 为线程数量
  // 执行任务
        scheduledExecutorService.scheduleAtFixedRate(() -> {
            System.out.println("Run Schedule:" + new Date());
        }, 1, 3, TimeUnit.SECONDS); // 1s 后开始执行,每 3s 执行一次
    }
}
程序执行结果如下:
Run Schedule:Mon Aug 17 21:44:23 CST 2020
Run Schedule:Mon Aug 17 21:44:26 CST 2020
Run Schedule:Mon Aug 17 21:44:29 CST 2020
ScheduledExecutorService 可靠性测试
① 任务超时执行测试
ScheduledExecutorService 可以解决 Timer 任务之间相应影响的缺点,首先我们来测试一个任务执行时间过长,会不会对其他任务造成影响,测试代码如下:
public class MyScheduledExecutorService {
    public static void main(String[] args) {
        // 创建任务队列
        ScheduledExecutorService scheduledExecutorService =
                Executors.newScheduledThreadPool(10);
        // 执行任务 1
        scheduledExecutorService.scheduleAtFixedRate(() -> {
            System.out.println("进入 Schedule:" + new Date());
            try {
                // 休眠 5 秒
                TimeUnit.SECONDS.sleep(5);
            } catch (InterruptedException e) {
                e.printStackTrace();
            }
            System.out.println("Run Schedule:" + new Date());
        }, 1, 3, TimeUnit.SECONDS); // 1s 后开始执行,每 3s 执行一次
        // 执行任务 2
        scheduledExecutorService.scheduleAtFixedRate(() -> {
            System.out.println("Run Schedule2:" + new Date());
        }, 1, 3, TimeUnit.SECONDS); // 1s 后开始执行,每 3s 执行一次
    }
}
程序执行结果如下:
Run Schedule2:Mon Aug 17 11:27:55 CST 2020
进入 Schedule:Mon Aug 17 11:27:55 CST 2020
Run Schedule2:Mon Aug 17 11:27:58 CST 2020
Run Schedule:Mon Aug 17 11:28:00 CST 2020
进入 Schedule:Mon Aug 17 11:28:00 CST 2020
Run Schedule2:Mon Aug 17 11:28:01 CST 2020
Run Schedule2:Mon Aug 17 11:28:04 CST 2020
从上述结果可以看出,当任务 1 执行时间 5s 超过了执行频率 3s 时,并没有影响任务 2 的正常执行,因此使用 ScheduledExecutorService 可以避免任务执行时间过长对其他任务造成的影响。
② 任务异常测试
接下来我们来测试一下 ScheduledExecutorService 在一个任务异常时,是否会对其他任务造成影响,测试代码如下:
public class MyScheduledExecutorService {
    public static void main(String[] args) {
        // 创建任务队列
        ScheduledExecutorService scheduledExecutorService =
                Executors.newScheduledThreadPool(10);
        // 执行任务 1
        scheduledExecutorService.scheduleAtFixedRate(() -> {
            System.out.println("进入 Schedule:" + new Date());
            // 模拟异常
            int num = 8 / 0;
            System.out.println("Run Schedule:" + new Date());
        }, 1, 3, TimeUnit.SECONDS); // 1s 后开始执行,每 3s 执行一次
        // 执行任务 2
        scheduledExecutorService.scheduleAtFixedRate(() -> {
            System.out.println("Run Schedule2:" + new Date());
        }, 1, 3, TimeUnit.SECONDS); // 1s 后开始执行,每 3s 执行一次
    }
}
程序执行结果如下:
进入 Schedule:Mon Aug 17 22:17:37 CST 2020
Run Schedule2:Mon Aug 17 22:17:37 CST 2020
Run Schedule2:Mon Aug 17 22:17:40 CST 2020
Run Schedule2:Mon Aug 17 22:17:43 CST 2020
从上述结果可以看出,当任务 1 出现异常时,并不会影响任务 2 的执行。
ScheduledExecutorService 小结
在单机生产环境下建议使用 ScheduledExecutorService 来执行定时任务,它是 JDK 1.5 之后自带的 API,因此使用起来也比较方便,并且使用 ScheduledExecutorService 来执行任务,不会造成任务间的相互影响。
TOP 3:Spring Task
如果使用的是 Spring 或 Spring Boot 框架,可以直接使用 Spring Framework 自带的定时任务,使用上面两种定时任务的实现方式,很难实现设定了具体时间的定时任务,比如当我们需要每周五来执行某项任务时,但如果使用 Spring Task 就可轻松的实现此需求。
以 Spring Boot 为例,实现定时任务只需两步:
-
开启定时任务; -
添加定时任务。
具体实现步骤如下。
① 开启定时任务
开启定时任务只需要在 Spring Boot 的启动类上声明 @EnableScheduling 即可,实现代码如下:
@SpringBootApplication
@EnableScheduling // 开启定时任务
public class DemoApplication {
    // do someing
}
② 添加定时任务
定时任务的添加只需要使用 @Scheduled 注解标注即可,如果有多个定时任务可以创建多个 @Scheduled 注解标注的方法,示例代码如下:
import org.springframework.scheduling.annotation.Scheduled;
import org.springframework.stereotype.Component;

@Component // 把此类托管给 Spring,不能省略
public class TaskUtils {
    // 添加定时任务
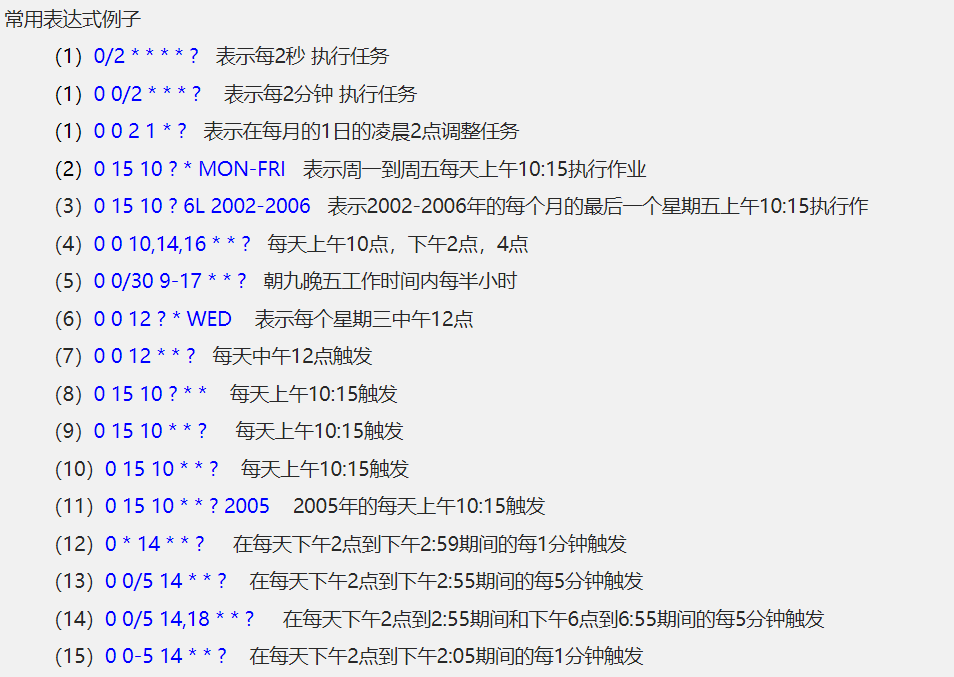
    @Scheduled(cron = "59 59 23 0 0 5") // cron 表达式,每周五 23:59:59 执行
    public void doTask(){
        System.out.println("我是定时任务~");
    }
}
注意:定时任务是自动触发的无需手动干预,也就是说 Spring Boot 启动后会自动加载并执行定时任务。
Cron 表达式
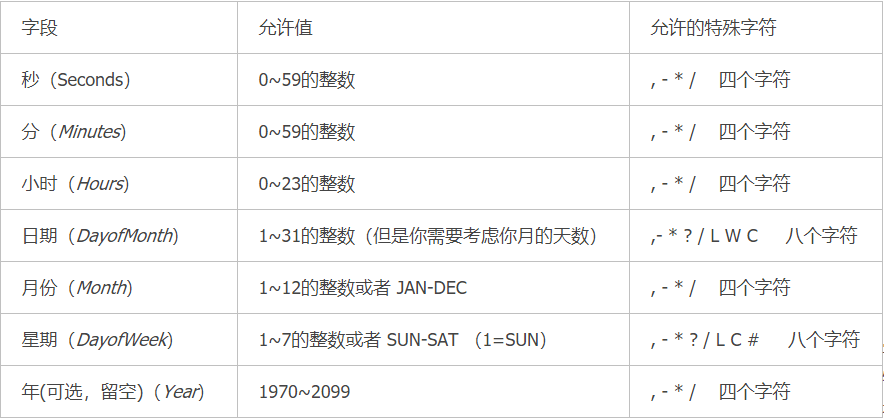
Spring Task 的实现需要使用 cron 表达式来声明执行的频率和规则,cron 表达式是由 6 位或者 7 位组成的(最后一位可以省略),每位之间以空格分隔,每位从左到右代表的含义如下:

其中 * 和 ? 号都表示匹配所有的时间。

cron 表达式在线生成地址:https://cron.qqe2.com/
知识扩展:分布式定时任务
上面的方法都是关于单机定时任务的实现,如果是分布式环境可以使用 Redis 来实现定时任务。
使用 Redis 实现延迟任务的方法大体可分为两类:通过 ZSet 的方式和键空间通知的方式。
① ZSet 实现方式
通过 ZSet 实现定时任务的思路是,将定时任务存放到 ZSet 集合中,并且将过期时间存储到 ZSet 的 Score 字段中,然后通过一个无线循环来判断当前时间内是否有需要执行的定时任务,如果有则进行执行,具体实现代码如下:
import redis.clients.jedis.Jedis;
import utils.JedisUtils;
import java.time.Instant;
import java.util.Set;

public class DelayQueueExample {
    // zset key
    private static final String _KEY = "myTaskQueue";

    public static void main(String[] args) throws InterruptedException {
        Jedis jedis = JedisUtils.getJedis();
        // 30s 后执行
        long delayTime = Instant.now().plusSeconds(30).getEpochSecond();
        jedis.zadd(_KEY, delayTime, "order_1");
        // 继续添加测试数据
        jedis.zadd(_KEY, Instant.now().plusSeconds(2).getEpochSecond(), "order_2");
        jedis.zadd(_KEY, Instant.now().plusSeconds(2).getEpochSecond(), "order_3");
        jedis.zadd(_KEY, Instant.now().plusSeconds(7).getEpochSecond(), "order_4");
        jedis.zadd(_KEY, Instant.now().plusSeconds(10).getEpochSecond(), "order_5");
        // 开启定时任务队列
        doDelayQueue(jedis);
    }

    /**
     * 定时任务队列消费
     * @param jedis Redis 客户端
     */
    public static void doDelayQueue(Jedis jedis) throws InterruptedException {
        while (true) {
            // 当前时间
            Instant nowInstant = Instant.now();
            long lastSecond = nowInstant.plusSeconds(-1).getEpochSecond(); // 上一秒时间
            long nowSecond = nowInstant.getEpochSecond();
            // 查询当前时间的所有任务
            Set data = jedis.zrangeByScore(_KEY, lastSecond, nowSecond);
            for (String item : data) {
                // 消费任务
                System.out.println("消费:" + item);
            }
            // 删除已经执行的任务
            jedis.zremrangeByScore(_KEY, lastSecond, nowSecond);
            Thread.sleep(1000); // 每秒查询一次
        }
    }
}
② 键空间通知
我们可以通过 Redis 的键空间通知来实现定时任务,它的实现思路是给所有的定时任务设置一个过期时间,等到了过期之后,我们通过订阅过期消息就能感知到定时任务需要被执行了,此时我们执行定时任务即可。
默认情况下 Redis 是不开启键空间通知的,需要我们通过 config set notify-keyspace-events Ex 的命令手动开启,开启之后定时任务的代码如下:
import redis.clients.jedis.Jedis;
import redis.clients.jedis.JedisPubSub;
import utils.JedisUtils;

public class TaskExample {
    public static final String _TOPIC = "__keyevent@0__:expired"; // 订阅频道名称
    public static void main(String[] args) {
        Jedis jedis = JedisUtils.getJedis();
        // 执行定时任务
        doTask(jedis);
    }

    /**
     * 订阅过期消息,执行定时任务
     * @param jedis Redis 客户端
     */
    public static void doTask(Jedis jedis) {
        // 订阅过期消息
        jedis.psubscribe(new JedisPubSub() {
            @Override
            public void onPMessage(String pattern, String channel, String message) {
                // 接收到消息,执行定时任务
                System.out.println("收到消息:" + message);
            }
        }, _TOPIC);
    }
}
作者 | 王磊
来源 | Java中文社群(ID:javacn666)
0 条评论