
ReentrantLock 重入锁
在说 Redisson 之前我们先来说一下 JDK 可重入锁: ReentrantLock
ReentrantLock 保证了 JVM 共享资源同一时刻只允许单个线程进行操作
使用50个线程模拟秒杀一个商品,使用–运算符来实现商品减少,从结果有序性就可以看出是否为加锁状态
实现思路
ReentrantLock 内部公平锁与非公平锁继承了 AQS[AbstractQueuedSynchronizer]
1、AQS 内部通过 volatil 修饰的 int 类型变量 state 控制并发情况下线程安全问题及锁重入
2、将未竞争到锁的线程放入 AQS 的队列中通过 LockSupport#park、unPark 挂起唤醒
简要描述哈, 详情可以查看具体的文章
Redisson
可以直接查看 Github Redisson官网 介绍, 没有了解过的小伙伴, 看一下 Redisson 的 WIKI 目录, 仔细瞅瞅 Redis 是如何被 Redisson 武装到牙齿的

这里先过一下和文章有关的一部分内容
通过项目简介可以看出来, 写这个项目介绍的人水平非常哇塞哈, 从第一段咱们就知道了两个问题
Redisson 是什么
Redisson 是架设在 Redis 基础上的一个 Java 驻内存数据网格框架, 充分利用 Redis 键值数据库提供的一系列优势, 基于 Java 实用工具包中常用接口, 为使用者提供了 一系列具有分布式特性的常用工具类
Redisson 的优势
使得原本作为协调单机多线程并发程序的工具包 获得了协调分布式多机多线程并发系统的能力, 大大降低了设计和研发大规模分布式系统的难度
同时结合各富特色的分布式服务, 更进一步 简化了分布式环境中程序相互之间的协作
“
了解到这里就差不多了, 就不向下扩展了, 想要了解详细用途的, 翻一下上面的目录
Redisson 重入锁
由于 Redisson 太过于复杂, 设计的 API 调用大多用 Netty 相关, 所以这里只对 如何加锁、如何实现重入锁进行分析以及如何锁续时进行分析
创建锁
我这里是将 Redisson 的源码下载到本地了
下面这个简单的程序, 就是使用 Redisson 创建了一个非公平的可重入锁
lock() 方法加锁成功 默认过期时间 30 秒, 并且支持 “看门狗” 续时功能
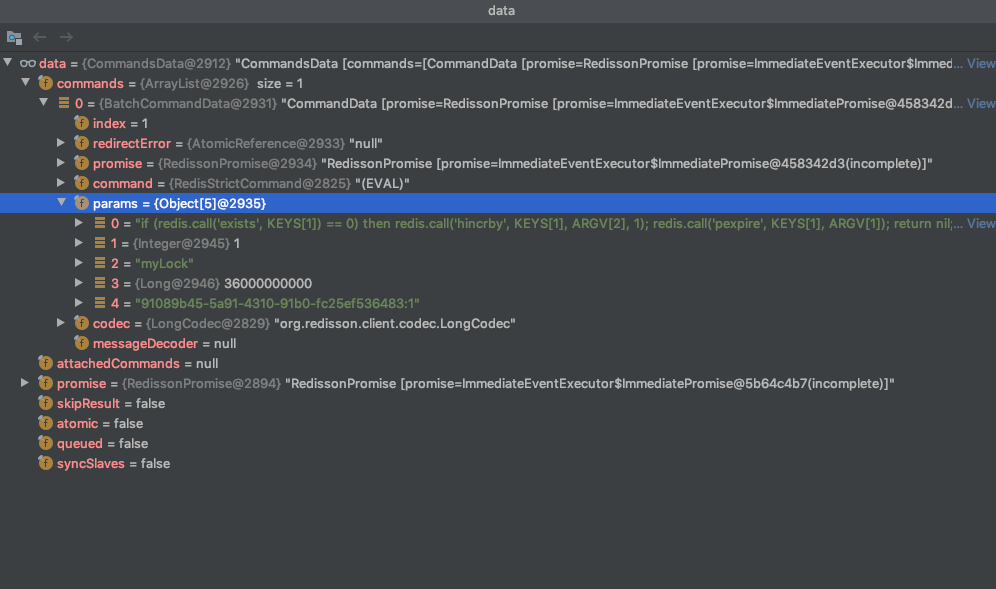
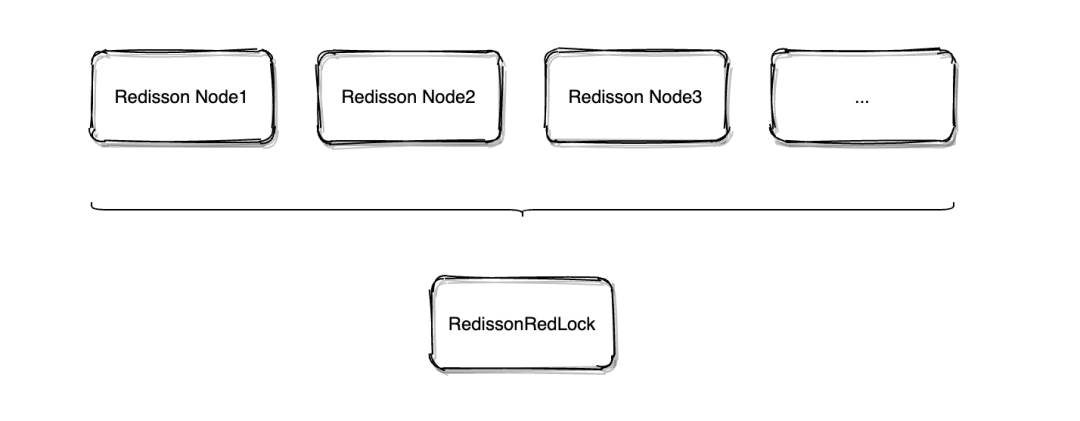
我们先来看一下 RLock 接口的声明 RLock 继承了 JDK 源码 JUC 包下的 Lock 接口, 同时也继承了 RLockAsync RLockAsync 从字面意思看是 支持异步的锁, 证明获取锁时可以异步获取 “ 看了 Redisson 的源码会知道, 注释比黄金贵 🙃️ 由于获取锁的 API 较多, 我们这里以 lock() 做源码讲解, 看接口定义相当简单 根据上面的小 Demo, 看下第一步获取锁是如何做的 Redisson 中所有 Redis 命令都是通过 …Executor 执行的 获取到默认的同步执行器后, 就要初始化 RedissonLock 我们来看一下 RLock#lock() 底层是如何获取锁的 leaseTime: 加锁到期时间, -1 使用默认值 30 秒 unit: 时间单位, 毫秒、秒、分钟、小时… interruptibly: 是否可被中断标示 这一段代码是用来执行加锁, 继续看下方法实现 lock() 以及 tryLock(…) 方法最终都会调用此方法, 分为两个流程分支 1、tryLock(…) API 异步加锁返回 2、lock() & tryLock() API 异步加锁并进行锁续时 继续看一下 tryLockInnerAsync(…) 详细的加锁流程, 内部采用的 Lua 脚本形式, 保证了原子性操作 到这一步大家就很明了了, 将 Lua 脚本被 Redisoon 包装最后通过 Netty 进行传输 “ evalWriteAsync(…) 是对 Eval 命令的封装以及 Netty 的应用就不继续跟进了 执行 Redis 加锁的 Lua 脚本, 截个图让大家看一下参数以及具体含义 KEYS[1]: myLock ARGV[1]: 36000… 这个是过期时间, 自己测试的, 单位毫秒 ARGV[2]: UUID + 线程 ID 整个 Lua 脚本加锁的流程画图如下: 现在回过头看一下获取到锁之后, 是如何为锁进行延期操作的 之前有和军哥聊过这个话题, 他说的思路和 Redisson 中体现的基本一致 说一下 Redisson 的具体实现思路吧, 中文翻译叫做 “看门狗” 1、获取到锁之后执行 “看门狗” 流程 2、使用 Netty 的 Timeout 实现定时延时 3、比如锁过期 30 秒, 每过 1/3 时间也就是 10 秒会检查锁是否存在, 存在则更新锁的超时时间 可能会有小伙伴会提出这么一个疑问, 如果检查返回存在, 设置锁过期时刚好锁被释放了怎么办? 有这样的疑问, 代表确实用心去考虑所有可能发生的情况了, 但是不必担心哈 Redisson 中使用的 Lua 脚本做的检查及设置过期时间操作, 本身是原子性的不会出现上面情况 “ 如果不想要引用 Netty 的包, 使用延时队列等包工具也是可以完成 “看门狗” 这里也贴一哈相关代码, 能够让小伙伴更直观的了解如何锁续时的 我可真是个暖男, 上代码 RedissonLock#tryAcquireAsync(…) 可以看到续时方法将 threadId 当作标识符进行续时 知道核心理念就好了, 没必要研究每一行代码哈 解锁时的操作相对加锁还是比较简单的 解锁成功后会将之前的”看门狗” Timeout 续时取消, 并返回成功 又是一个精髓点, 解锁的 Lua 脚本定义 还是来张图理解哈, Lua 脚本会详细分析 老规矩, 图片加参数说明 KEYS[1]: myLock KEYS[2]: redisson_lock_channel:{myLock} ARGV[1]: 0 ARGV[2]: 360000… (过期时间) ARGV[3]: 7f0c54e2…(Hash 中的锁 Key) 不可否认, Redisson 设计的分布式锁真的很 NB, 但是还是没有解决 主从节点下异步同步数据导致锁丢失问题 所以 Redis 作者 Antirez 推出 红锁算法, 这个算法的精髓就是: 没有从节点, 如果部署多台 Redis, 各实例之间相互独立, 不存在主从复制或者其他集群协调机制 创建多个 Redisson Node, 由这些无关联的 Node 组成一个完整的分布式锁 当然, 对于 Redlock 算法不是没有质疑声, 大家可以去 Redis 官网查看Martin Kleppmann 与 Redis 作者Antirez 的辩论 CAP 原则又称 CAP 定理, 指的是在一个分布式系统中, Consistency(一致性)、 Availability(可用性)、Partition tolerance(分区容错性), 三者不可得兼 一致性(C) : 在分布式系统中的所有数据备份, 在同一时刻是否同样的值(等同于所有节点访问同一份最新的数据副本) 可用性(A): 在集群中一部分节点故障后, 集群整体是否还能响应客户端的读写请求(对数据更新具备高可用性) 分区容忍性(P): 以实际效果而言, 分区相当于对通信的时限要求. 系统如果不能在时限内达成数据一致性, 就意味着发生了分区的情况, 必须就当前操作在 C 和 A 之间做出选择 如果要满足上述分布式锁之间的强一致性, 可以采用 Zookeeper 的分布式锁, 因为它底层的 ZAB协议(原子广播协议), 天然满足 CP 但是这也意味着性能的下降, 所以不站在具体数据下看 Redis 和 Zookeeper, 代表着性能和一致性的取舍 如果项目没有强依赖 ZK, 使用 Redis 就好了, 因为现在 Redis 用途很广, 大部分项目中都引用了 Redis 没必要对此再引入一个新的组件, 如果业务场景对于 Redis 异步方式的同步数据造成锁丢失无法忍受, 在业务层处理就好了 最近都在写多线程源码相关的, 后面会输出 JUC 下源码解析 1、CountDownLatch 2、ThreadLocal 3、Atomic 相关 [elementor-template id=”6632″]public static void main(String[] args){
Config config = new Config();
config.useSingleServer()
.setPassword("123456")
.setAddress("redis://127.0.0.1:6379");
RedissonClient redisson = Redisson.create(config);
RLock lock = redisson.getLock("myLock");
try {
lock.lock();
// 业务逻辑
} finally {
lock.unlock();
}
}
public interface RLock extends Lock, RLockAsync{}
/**
 * lock 并没有指定锁过期时间, 默认 30 秒
 * 如果获取到锁, 会对锁进行续时
 */
void lock();
获取锁实例
RLock lock = redisson.getLock("myLock");

// name 就是锁名称
public RLock getLock(String name){
   // 默认创建的同步执行器, (存在异步执行器, 因为锁的获取和释放是有强一致性要求, 默认同步)
    return new RedissonLock(connectionManager.getCommandExecutor(), name);
}
public RedissonLock(CommandAsyncExecutor commandExecutor, String name){
    super(commandExecutor, name);
    this.commandExecutor = commandExecutor;
   // 唯一ID
    this.id = commandExecutor.getConnectionManager().getId();
   // 等待获取锁时间
    this.internalLockLeaseTime = commandExecutor.getConnectionManager().getCfg().getLockWatchdogTimeout();
   // ID + 锁名称
    this.entryName = id + ":" + name;
   // 发布订阅, 后面关于加、解锁流程会用到
    this.pubSub = commandExecutor.getConnectionManager().getSubscribeService().getLockPubSub();
}
尝试获取锁
@Override
public void lock(){
    try {
        lock(-1, null, false);
    } catch (InterruptedException e) {
        throw new IllegalStateException();
    }
}
private void lock(long leaseTime, TimeUnit unit, boolean interruptibly) throws InterruptedException {
    // 获取当前线程ID
    long threadId = Thread.currentThread().getId();
    // 🚩 尝试获取锁, 下面重点分析
    Long ttl = tryAcquire(-1, leaseTime, unit, threadId);
    // 成功获取锁, 过期时间为空
    if (ttl == null) {
        return;
    }

    // 订阅分布式锁, 解锁时进行通知
    RFuture future = subscribe(threadId);
    if (interruptibly) {
        commandExecutor.syncSubscriptionInterrupted(future);
    } else {
        commandExecutor.syncSubscription(future);
    }

    try {
        while (true) {
            // 再次尝试获取锁
            ttl = tryAcquire(-1, leaseTime, unit, threadId);
        // 成功获取锁, 过期时间为空, 成功返回
            if (ttl == null) {
                break;
            }

            // 锁过期时间如果大于零, 则进行带过期时间的阻塞获取
            if (ttl >= 0) {
                try {
                    // 获取不到锁会在这里进行阻塞, Semaphore, 解锁时释放信号量通知
                    future.getNow().getLatch().tryAcquire(ttl, TimeUnit.MILLISECONDS);
                } catch (InterruptedException e) {
                    if (interruptibly) {
                        throw e;
                    }
                    future.getNow().getLatch().tryAcquire(ttl, TimeUnit.MILLISECONDS);
                }
                // 锁过期时间小于零, 则死等, 区分可中断及不可中断
            } else {
                if (interruptibly) {
                    future.getNow().getLatch().acquire();
                } else {
                    future.getNow().getLatch().acquireUninterruptibly();
                }
            }
        }
    } finally {
        // 取消订阅
        unsubscribe(future, threadId);
    }
}
Long ttl = tryAcquire(-1, leaseTime, unit, threadId);

private Long tryAcquire(long waitTime, long leaseTime, TimeUnit unit, long threadId){
    return get(tryAcquireAsync(waitTime, leaseTime, unit, threadId));
}
private  RFuture tryAcquireAsync(long waitTime, long leaseTime, TimeUnit unit, long threadId){
    // 执行 tryLock(...) 才会进入
    if (leaseTime != -1) {
        // 进行异步获取锁
        return tryLockInnerAsync(waitTime, leaseTime, unit, threadId, RedisCommands.EVAL_LONG);
    }
    // 尝试异步获取锁, 获取锁成功返回空, 否则返回锁剩余过期时间
    RFuture ttlRemainingFuture = tryLockInnerAsync(waitTime,
            commandExecutor.getConnectionManager().getCfg().getLockWatchdogTimeout(),
            TimeUnit.MILLISECONDS, threadId, RedisCommands.EVAL_LONG);
    // ttlRemainingFuture 执行完成后触发此操作
    ttlRemainingFuture.onComplete((ttlRemaining, e) -> {
        if (e != null) {
            return;
        }
       // ttlRemaining == null 代表获取了锁
        // 获取到锁后执行续时操作
        if (ttlRemaining == null) {
            scheduleExpirationRenewal(threadId);
        }
    });
    return ttlRemainingFuture;
}
RFuture tryLockInnerAsync(long waitTime, long leaseTime, TimeUnit unit, long threadId, RedisStrictCommand command){
    internalLockLeaseTime = unit.toMillis(leaseTime);

    return evalWriteAsync(getName(), LongCodec.INSTANCE, command,
            "if (redis.call('exists', KEYS[1]) == 0) then " +
                    "redis.call('hincrby', KEYS[1], ARGV[2], 1); " +
                    "redis.call('pexpire', KEYS[1], ARGV[1]); " +
                    "return nil; " +
                    "end; " +
                    "if (redis.call('hexists', KEYS[1], ARGV[2]) == 1) then " +
                    "redis.call('hincrby', KEYS[1], ARGV[2], 1); " +
                    "redis.call('pexpire', KEYS[1], ARGV[1]); " +
                    "return nil; " +
                    "end; " +
                    "return redis.call('pttl', KEYS[1]);",
            Collections.singletonList(getName()), internalLockLeaseTime, getLockName(threadId));
}
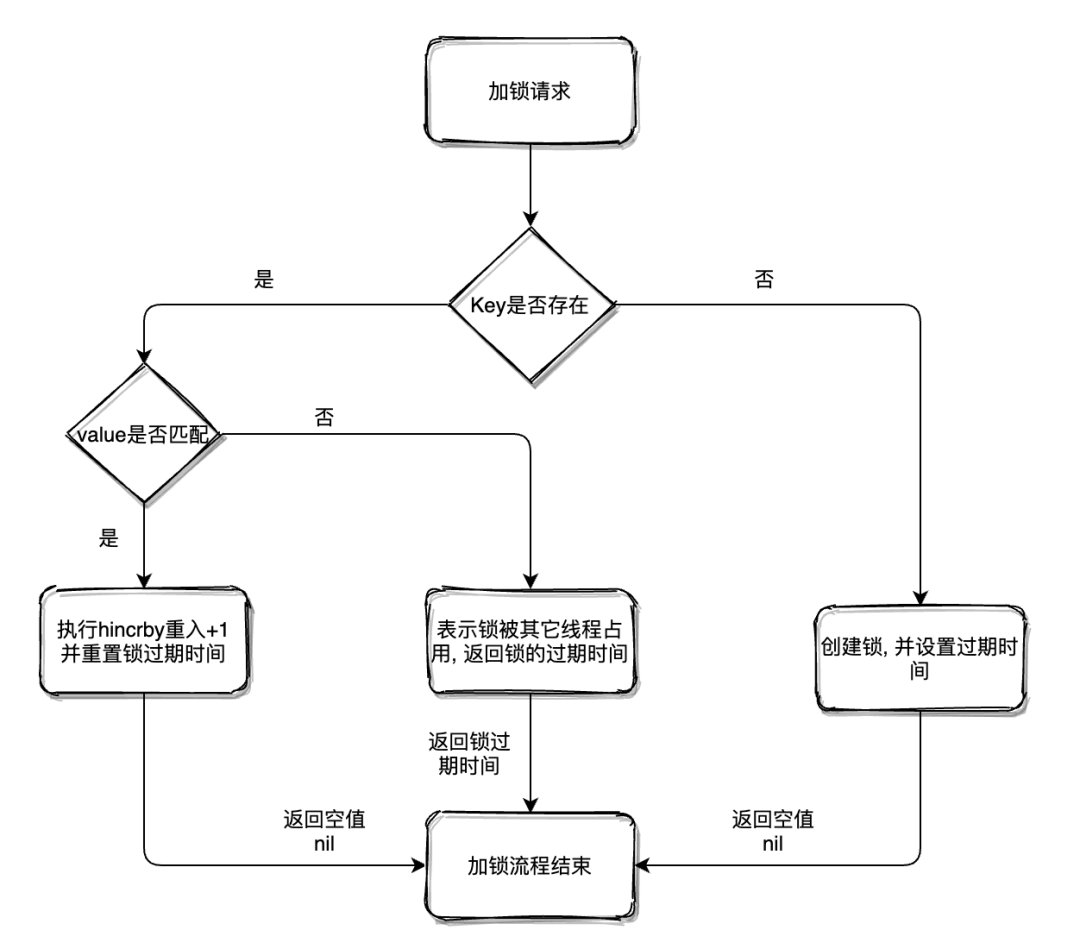
加锁 Lua
# KEYS[1] 代表上面的 myLock
# 判断 KEYS[1] 是否存在, 存在返回 1, 不存在返回 0
if (redis.call('exists', KEYS[1]) == 0) then
  # 当 KEYS[1] == 0 时代表当前没有锁
  # 使用 hincrby 命令发现 KEYS[1] 不存在并新建一个 hash
  # ARGV[2] 就作为 hash 的第一个key, val 为 1
  # 相当于执行了 hincrby myLock 91089b45... 1
 redis.call('hincrby', KEYS[1], ARGV[2], 1);
  # 设置 KEYS[1] 过期时间, 单位毫秒
 redis.call('pexpire', KEYS[1], ARGV[1]);
 return nil;
end;
# 查找 KEYS[1] 中 key ARGV[2] 是否存在, 存在回返回 1
if (redis.call('hexists', KEYS[1], ARGV[2]) == 1) then
  # 同上, ARGV[2] 为 key 的 val +1
 redis.call('hincrby', KEYS[1], ARGV[2], 1);
  # 同上
 redis.call('pexpire', KEYS[1], ARGV[1]);
return nil;
end;
# 返回 KEYS[1] 过期时间, 单位毫秒
return redis.call('pttl', KEYS[1]);
锁续时


private  RFuture tryAcquireAsync(long waitTime, long leaseTime, TimeUnit unit, long threadId){
    // ...
    // 尝试异步获取锁, 获取锁成功返回空, 否则返回锁剩余过期时间
    RFuture ttlRemainingFuture = tryLockInnerAsync(waitTime,
            commandExecutor.getConnectionManager().getCfg().getLockWatchdogTimeout(),
            TimeUnit.MILLISECONDS, threadId, RedisCommands.EVAL_LONG);
    // ttlRemainingFuture 执行完成后触发此操作
    ttlRemainingFuture.onComplete((ttlRemaining, e) -> {
        if (e != null) {
            return;
        }
        // 获取到锁后执行续时操作
        if (ttlRemaining == null) {
            scheduleExpirationRenewal(threadId);
        }
    });
    return ttlRemainingFuture;
}
private void scheduleExpirationRenewal(long threadId){
    ExpirationEntry entry = new ExpirationEntry();
    ExpirationEntry oldEntry = EXPIRATION_RENEWAL_MAP.putIfAbsent(getEntryName(), entry);
    if (oldEntry != null) {
        oldEntry.addThreadId(threadId);
    } else {
        entry.addThreadId(threadId);
        renewExpiration();
    }
}
private void renewExpiration(){
    ExpirationEntry ee = EXPIRATION_RENEWAL_MAP.get(getEntryName());
    if (ee == null) {
        return;
    }

    Timeout task = commandExecutor.getConnectionManager().newTimeout(new TimerTask() {
        @Override
        public void run(Timeout timeout) throws Exception {
            ExpirationEntry ent = EXPIRATION_RENEWAL_MAP.get(getEntryName());
            if (ent == null) {
                return;
            }
            Long threadId = ent.getFirstThreadId();
            if (threadId == null) {
                return;
            }

            RFuture future = renewExpirationAsync(threadId);
            future.onComplete((res, e) -> {
                if (e != null) {
                    log.error("Can't update lock " + getName() + " expiration", e);
                    return;
                }

                if (res) {
                    // 调用本身
                    renewExpiration();
                }
            });
        }
    }, internalLockLeaseTime / 3, TimeUnit.MILLISECONDS);

    ee.setTimeout(task);
}
解锁操作
@Override
public void unlock(){
    try {
        get(unlockAsync(Thread.currentThread().getId()));
    } catch (RedisException e) {
        if (e.getCause() instanceof IllegalMonitorStateException) {
            throw (IllegalMonitorStateException) e.getCause();
        } else {
            throw e;
        }
    }
}
@Override
public RFuture unlockAsync(long threadId){
    RPromise result = new RedissonPromise();
    RFuture future = unlockInnerAsync(threadId);

    future.onComplete((opStatus, e) -> {
       // 取消自动续时功能
        cancelExpirationRenewal(threadId);

        if (e != null) {
           // 失败
            result.tryFailure(e);
            return;
        }

        if (opStatus == null) {
            IllegalMonitorStateException cause = new IllegalMonitorStateException("attempt to unlock lock, not locked by current thread by node id: "
                    + id + " thread-id: " + threadId);
            result.tryFailure(cause);
            return;
        }
    // 解锁成功
        result.trySuccess(null);
    });

    return result;
}
protected RFuture unlockInnerAsync(long threadId){
    return evalWriteAsync(getName(), LongCodec.INSTANCE, RedisCommands.EVAL_BOOLEAN,
            "if (redis.call('hexists', KEYS[1], ARGV[3]) == 0) then " +
                    "return nil;" +
                    "end; " +
                    "local counter = redis.call('hincrby', KEYS[1], ARGV[3], -1); " +
                    "if (counter > 0) then " +
                    "redis.call('pexpire', KEYS[1], ARGV[2]); " +
                    "return 0; " +
                    "else " +
                    "redis.call('del', KEYS[1]); " +
                    "redis.call('publish', KEYS[2], ARGV[1]); " +
                    "return 1; " +
                    "end; " +
                    "return nil;",
            Arrays.asList(getName(), getChannelName()), LockPubSub.UNLOCK_MESSAGE, internalLockLeaseTime, getLockName(threadId));
}
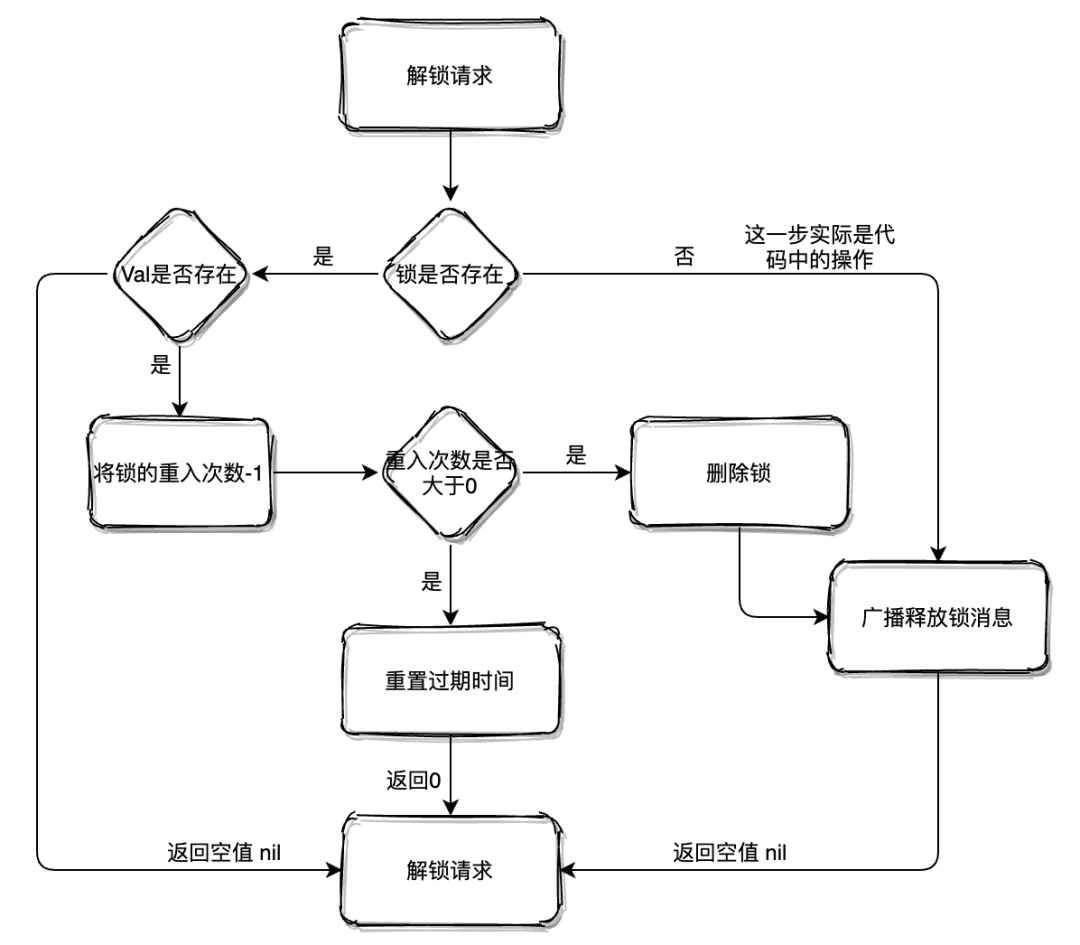
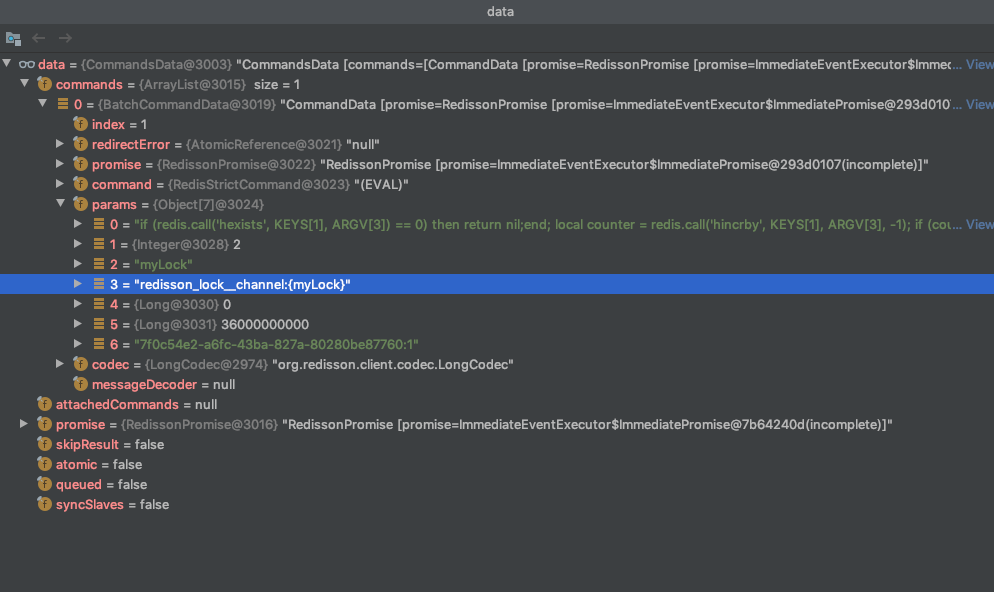
解锁 Lua
# 判断 KEYS[1] 中是否存在 ARGV[3]
if (redis.call('hexists', KEYS[1], ARGV[3]) == 0) then
return nil;
end;
# 将 KEYS[1] 中 ARGV[3] Val - 1
local counter = redis.call('hincrby', KEYS[1], ARGV[3], -1);
# 如果返回大于0 证明是一把重入锁
if (counter > 0) then
  # 重制过期时间
 redis.call('pexpire', KEYS[1], ARGV[2]);
return 0;
else
  # 删除 KEYS[1]
 redis.call('del', KEYS[1]);
  # 通知阻塞等待线程或进程资源可用
 redis.call('publish', KEYS[2], ARGV[1]);
return 1;
end;
return nil;
Redlock 算法

如何使用
public static void main(String[] args){
    String lockKey = "myLock";
    Config config = new Config();
    config.useSingleServer().setPassword("123456").setAddress("redis://127.0.0.1:6379");
    Config config2 = new Config();
    config.useSingleServer().setPassword("123456").setAddress("redis://127.0.0.1:6380");
    Config config3 = new Config();
    config.useSingleServer().setPassword("123456").setAddress("redis://127.0.0.1:6381");

    RLock lock = Redisson.create(config).getLock(lockKey);
    RLock lock2 = Redisson.create(config2).getLock(lockKey);
    RLock lock3 = Redisson.create(config3).getLock(lockKey);

    RedissonRedLock redLock = new RedissonRedLock(lock, lock2, lock3);

    try {
        redLock.lock();
    } finally {
        redLock.unlock();
    }
}
CAP 原则之间的取舍
分布式锁选型
写在最后的话
0 条评论