今天抽空给大家整理了一份关于RocketMQ的高性能知识点文章总结。希望能对各位读者有所帮助。
关于RockeMQ的基本介绍
简介
RocketMQ是一个纯Java、分布式、队列模型的开源消息中间件,前身是MetaQ,是阿里参考Kafka特点研发的一个队列模型的消息中间件,后开源给apache基金会成为了apache顶级开源项目,具有高性能、高可靠、高实时、分布式特点。
发展背景
-
2011年:业界出现了现在被很多大数据领域所推崇的Kafka消息引擎,阿里巴巴在研究了Kafka的整体机制和架构设计之后,基于Kafka的设计使用Java进行了完全重写并推出了MetaQ 1.0版本,主要是用于解决顺序消息和海量堆积的问题。
-
2012年:阿里巴巴开源其自研的第三代分布式消息中间件——RocketMQ。
-
2016年11月:阿里将RocketMQ捐献给Apache软件基金会,正式成为孵化项目。
-
2017年2月20日:RocketMQ正式发布4.0版本,专家称新版本适用于电商领域,金融领域,大数据领域,兼有物联网领域的编程模型。
-
2022年:RocketMQ正式发布5.0版本,这也是目前最新版本。
RocketMQ的各个特点
-
单机吞吐量:10w/s。
-
可用性:支持双主双从的分布式架构,具备高可用特性。支持使用topic,tag,SQL来对消息进行筛选。底层结构通过多队列来承载消息存储等特性。可靠的FIFO和严格有序的消息队列中间件。支持多种消息传递协议,例如grpc,Mqtt,Jms….
-
源码实现:Java语言。
PageCache和Mmap
RocketMQ这款中间件具有着单机10w+的吞吐量,其底层原因,实际上得从操作系统原理开始和大家讲起。
顺序写入
磁盘的写步骤通常是:CPU发送一个写信号给到磁盘磁头,接着磁头需要进行寻道操作,找到对应的磁道后,定位对应的位置进行数据写入。所以如果数据是随机写入的话,磁头就需要频繁地切换盘道进行数据的写入,整体耗时会有所提升。
顺序写,其实是一种非常常见的提升IO写性能的方式,利用连续的写入地址,从而减少磁头的切换次数,提升性能。
PageCache
为了提升对文件的读写效率,Linux 内核会以页大小(4KB)为单位,将文件划分为多数据块。当用户对文件中的某个数据块进行读写操作时,内核首先会申请一个内存页(称为 页缓存)与文件中的数据块进行绑定。
例如下边这张图,当我们发起一次系统调用的write方法,想要将用户态中的数据写入磁盘的时候,其实是需要发生以下操作的:
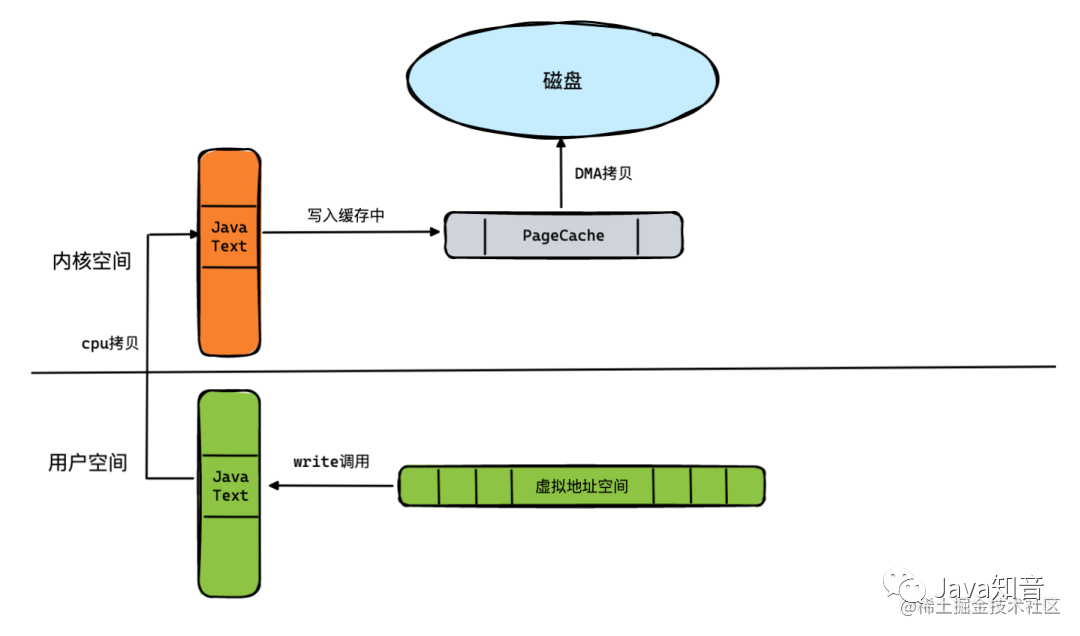
首先,将用户地址空间的数据通过CPU拷贝,放入到内核空间中,并且写入一个PageCache里面,然后通过DMA去将PageCache的数据写入到磁盘。
这里面由于有CPU拷贝这样的重操作,所以想要提升吞吐量,必须解决这个问题。而RocketMQ的创作团队,则是通过mmap技术来解决了它。
什么是mmap
mmap系统调用,让用户地址空间,跟文件做映射(实际是指向不存在的物理内存)。将内核态的一段空间地址映射到了用户态中,这样数据只需要写入到用户态的这段虚拟地址中,接着内核空间的DMA会将这段数据写入到磁盘中。这样之后,整体的写入流程就如下图所示:
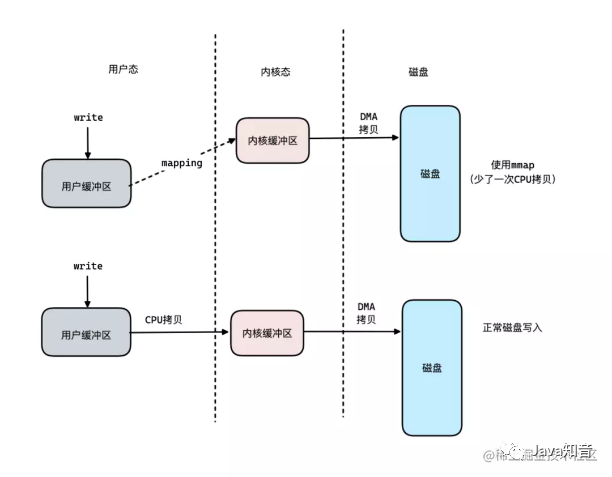
使用mmap技术之后,可以减少一次的CPU拷贝次数,提升性能。
这里补充一些说明,其实DMA本质上是一块访问独立的芯片。由于每次访问磁盘进行IO操作都会导致CPU大量的空闲时间,而DMA则是用于提升IO操作效率的一个角色,主要用于IO的数据传输,降低CPU等待时间。
Java里面如何使用mmap技术
在Java语言中,其实很早就有提供mmap方面的api了,下边是一段简单的mmap使用案例。
public class MmapUtils {
    public File commitLogFile;
    public MappedByteBuffer mappedByteBuffer;
    public int mappedSize = 0;
    public int writePos = 0;


    public MmapUtils(String commitLogPath, int mappedSize) {
        this.commitLogFile = new File(commitLogPath);
        if(!commitLogFile.exists()){
            try {
                commitLogFile.createNewFile();
            } catch (IOException e) {
                e.printStackTrace();
            }
        }
        this.mappedSize = mappedSize;
        try {
            mappedByteBuffer = new RandomAccessFile(commitLogFile, "rw").getChannel().map(FileChannel.MapMode.READ_WRITE, 0, mappedSize);
        } catch (IOException e) {
            e.printStackTrace();
        }
    }


    /**
     * 往磁盘写数据
     *
     * @param content
     * @return
     */
    public int writeFile(String content) {
        mappedByteBuffer.put(content.getBytes());
        //强制刷盘
        mappedByteBuffer.force();
        writePos = mappedByteBuffer.position();
        return 1;
    }


    /**
     * 从磁盘中读取数据
     *
     * @param len
     * @return
     */
    public byte[] readContent(int len) {
        mappedByteBuffer.position(0);
        byte[] dest = new byte[len];
        int j = 0;
        for (int i = 0; i             byte b = mappedByteBuffer.get();
            if (b != 0) {
                dest[j++] = b;
            }
        }
        return dest;
    }
}
mmap存在的缺陷
其实使用mmap技术还是存在一些缺陷的。
导致缺页中断问题
我们知道,在操作系统的中,数据通常都是被放在磁盘中的,只有在需要计算的时候,才会将数据加载到内存中,而每次加载的单位都是以“页”作为基础,假设我们需要访问一块存在于磁盘,但是没有被加载到内存中的数据,这种情况,我们称之为 “软性的缺页中断” 。 如果数据是存在于内存,但是该页的地址没有被注册到MMU中,我们则称之为 “硬性的缺页中断” 。
总之不管是软性还是硬性的中断,都需要重新建立一次数据的内存映射,比较消耗性能。
mmap对于文件的大小有一定要求
使用mmap技术之后,我们不可以使用2gb大小以上的文件去做映射,同时文件的长度也不建议做变长,最好是固定的大小。最后对于小文件而言,使用mmap可能性能还不如直接的原始IO操作。
RocketMQ对mmap的优化
好了,现在我们了解了mmap存在的缺陷之后,来看看RocketMQ是如何解决这些不足点的。
预映射
在RocketMQ的源代码里,可以看到这样一份代码,它的名字叫做:org.apache.rocketmq.store.AllocateMappedFileService。这个类负责在rocketmq启动时,预先分配mmap的文件映射。
文件预热
调用mmap进行内存映射后,OS只是建立虚拟内存地址至物理地址的映射表,没有实际加载任何文件至内存。依靠一次缺页加载4K,1G的commitLog需要发生256次缺页中断。而在RocketMQ的源代码中,进行了madvise系统调用,其目的是使操作系统做一次内存映射后对应的文件数据尽可能多地预加载进内存,从而实现预热。
内存锁定
将进程使用的部分或者全部的地址空间锁定在物理内存中,并会先写入一些随机值到mmap映射出的内存空间里,防止其被交换到swap空间。基于mlock系统调用。
堆外缓存
到这里,我们了解了RocketMQ内部通过使用PageCache去让我们的数据写入如写入内存般轻松,但是这在极端情况下,可能会有出现频繁出现缺页中断的情况,以及PageCache阻塞,这种情况下,Broker节点会返回一个SYSTEM_BUSY的信号给到客户端,不过这类场景在实际生产中很少会出现。为了避免这种情况,RocketMQ底层增加了一套堆外缓存来优化这类场景。当PageCache写入阻塞的时候,可以选择写入到堆外缓存中,之后再从堆外缓存 (DirectByteBuffer) 写入到PageCache。
RocketMQ中的mmap预分配实现分析
下边让我们来看看RocketMQ底层是如何进行mmap的文件映射预分配的。在RocketMQ的源代码中,当服务启动之后,AllocateMappedFileService这个线程类便会开始执行。

线程启动之后,便会执行mmapOperation方法,这个方法的大致步骤如下:
-
从优先级队列中获取AllocateRequest
-
创建MappedFile
-
根据配置是否预热MappedFile(填充0字节),将MappedFile放入到AllocateRequest
-
如果出现IOException将AllocateRequest重新放入优先级队列
-
调用AllocateRequest的CountDownLatch#countDown方法通知putRequestAndReturnMappedFile线程
整体执行目的总结起来就是:初始化+预热mappedFile。
关于mmapOperation的源代码和其含义,我列了一份出来给各位读者查看:
/**
 * Only interrupted by the external thread, will return false
 */
private boolean mmapOperation() {
    boolean isSuccess = false;
    AllocateRequest req = null;
    try {
        // 从优先级队列里获取AllocateRequest
        req = this.requestQueue.take();
        //从Map里获取AllocateRequest
        AllocateRequest expectedRequest = this.requestTable.get(req.getFilePath());
        if (null == expectedRequest) {
            log.warn("this mmap request expired, maybe cause timeout " + req.getFilePath() + " "
                + req.getFileSize());
            return true;
        }
        //putRequestAndReturnMappedFile里map与优先级队列并不是强一致,是最终一致的
        if (expectedRequest != req) {
            log.warn("never expected here,  maybe cause timeout " + req.getFilePath() + " "
                + req.getFileSize() + ", req:" + req + ", expectedRequest:" + expectedRequest);
            return true;
        }


        if (req.getMappedFile() == null) {
            long beginTime = System.currentTimeMillis();


            MappedFile mappedFile;
            //堆外内存
            if (messageStore.getMessageStoreConfig().isTransientStorePoolEnable()) {
                try {
                    mappedFile = ServiceLoader.load(MappedFile.class).iterator().next();
                    mappedFile.init(req.getFilePath(), req.getFileSize(), messageStore.getTransientStorePool());
                } catch (RuntimeException e) {
                    log.warn("Use default implementation.");
                    mappedFile = new MappedFile(req.getFilePath(), req.getFileSize(), messageStore.getTransientStorePool());
                }
            } else {
                mappedFile = new MappedFile(req.getFilePath(), req.getFileSize());
            }


            long eclipseTime = UtilAll.computeEclipseTimeMilliseconds(beginTime);
            //创建MappedFile 花费大于10ms打印日志
            if (eclipseTime > 10) {
                int queueSize = this.requestQueue.size();
                log.warn("create mappedFile spent time(ms) " + eclipseTime + " queue size " + queueSize
                    + " " + req.getFilePath() + " " + req.getFileSize());
            }


            // pre write mappedFile 默认warmMapedFileEnable=false,即默认不预热
            if (mappedFile.getFileSize() >= this.messageStore.getMessageStoreConfig()
                .getMapedFileSizeCommitLog()
                &&
                this.messageStore.getMessageStoreConfig().isWarmMapedFileEnable()) {
                // 文件预热
                mappedFile.warmMappedFile(this.messageStore.getMessageStoreConfig().getFlushDiskType(),
                    this.messageStore.getMessageStoreConfig().getFlushLeastPagesWhenWarmMapedFile());
            }


            req.setMappedFile(mappedFile);
            this.hasException = false;
            isSuccess = true;
        }
    } catch (InterruptedException e) {
        log.warn(this.getServiceName() + " interrupted, possibly by shutdown.");
        this.hasException = true;
        return false;
    } catch (IOException e) {
        log.warn(this.getServiceName() + " service has exception. ", e);
        this.hasException = true;
        if (null != req) {
            //重新插入请求到队列
            requestQueue.offer(req);
            try {
                Thread.sleep(1);
            } catch (InterruptedException ignored) {
            }
        }
    } finally {
        //AllocateRequest计数器减一,表示MappedFile已经创建完成
        if (req != null && isSuccess)
            req.getCountDownLatch().countDown();
    }
    return true;
}
在这段代码里头,我们可以看到有个文件预热的方法,叫做:warmMappedFile,该方法内部最后发出了一次系统调用,mlock方法。
 public void warmMappedFile(FlushDiskType type, int pages) {
        long beginTime = System.currentTimeMillis();
        ByteBuffer byteBuffer = this.mappedByteBuffer.slice();
        int flush = 0;
        long time = System.currentTimeMillis();
        for (int i = 0, j = 0; i this.fileSize; i += MappedFile.OS_PAGE_SIZE, j++) {
            byteBuffer.put(i, (byte) 0);
            // force flush when flush disk type is sync
            if (type == FlushDiskType.SYNC_FLUSH) {
                if ((i / OS_PAGE_SIZE) - (flush / OS_PAGE_SIZE) >= pages) {
                    flush = i;
                    mappedByteBuffer.force();
                }
            }


            // prevent gc
            if (j % 1000 == 0) {
                log.info("j={}, costTime={}", j, System.currentTimeMillis() - time);
                time = System.currentTimeMillis();
                try {
                    Thread.sleep(0);
                } catch (InterruptedException e) {
                    log.error("Interrupted", e);
                }
            }
        }


        // force flush when prepare load finished
        if (type == FlushDiskType.SYNC_FLUSH) {
            log.info("mapped file warm-up done, force to disk, mappedFile={}, costTime={}",
                this.getFileName(), System.currentTimeMillis() - beginTime);
            mappedByteBuffer.force();
        }
        log.info("mapped file warm-up done. mappedFile={}, costTime={}", this.getFileName(),
            System.currentTimeMillis() - beginTime);
        // 这里是一个系统调用
        this.mlock();
    }
这段代码的末尾处调用的mlock函数,它的内部是利用了Java的JNI机制,去进行系统调用。
JNA的本质就是将大多数native的方法封装到jar包中的动态库中,并且提供了一系列的机制来自动加载这个动态库。例如下边这个例子就是基于JNI去调用c lib中的print方法:
public class JNAUsage {


    public interface CLibrary extends Library {
        CLibrary INSTANCE = (CLibrary)
                Native.load((Platform.isWindows() ? "msvcrt" : "c"),
                        CLibrary.class);


        void printf(String format, Object... args);
    }


    public static void main(String[] args) {
        CLibrary.INSTANCE.printf("Hello, Worldn");
        for (int i=0;i             CLibrary.INSTANCE.printf("Argument %d: %sn", i, args[i]);
        }
    }
}
这个例子中,我们想要加载系统的c lib,从而使用c lib中的printf方法。
具体做法就是创建一个CLibrary interface,这个interface继承自Library,然后使用Native.load方法来加载c lib,最后在这个interface中定义要使用的lib中的方法即可。
那么在RocketMQ中,底层又是如何通过JNI来实现mlock的调用呢,来看源代码:
 public void mlock() {
        final long beginTime = System.currentTimeMillis();
        final long address = ((DirectBuffer) (this.mappedByteBuffer)).address();
        Pointer pointer = new Pointer(address);
        {
            int ret = LibC.INSTANCE.mlock(pointer, new NativeLong(this.fileSize));
            log.info("mlock {} {} {} ret = {} time consuming = {}", address, this.fileName, this.fileSize, ret, System.currentTimeMillis() - beginTime);
        }


        {
            int ret = LibC.INSTANCE.madvise(pointer, new NativeLong(this.fileSize), LibC.MADV_WILLNEED);
            log.info("madvise {} {} {} ret = {} time consuming = {}", address, this.fileName, this.fileSize, ret, System.currentTimeMillis() - beginTime);
        }
    }
上边代码中的LIbC是一个作者封装的系统调用接口文件,里面正好是映射了操作系统的mlock方法。
package org.apache.rocketmq.store.util;


import com.sun.jna.Library;
import com.sun.jna.Native;
import com.sun.jna.NativeLong;
import com.sun.jna.Platform;
import com.sun.jna.Pointer;


public interface LibC extends Library {
    LibC INSTANCE = (LibC) Native.loadLibrary(Platform.isWindows() ? "msvcrt" : "c", LibC.class);


    int MADV_WILLNEED = 3;
    int MADV_DONTNEED = 4;


    int MCL_CURRENT = 1;
    int MCL_FUTURE = 2;
    int MCL_ONFAULT = 4;


    /* sync memory asynchronously */
    int MS_ASYNC = 0x0001;
    /* invalidate mappings & caches */
    int MS_INVALIDATE = 0x0002;
    /* synchronous memory sync */
    int MS_SYNC = 0x0004;


    int mlock(Pointer var1, NativeLong var2);


    int munlock(Pointer var1, NativeLong var2);


    int madvise(Pointer var1, NativeLong var2, int var3);


    Pointer memset(Pointer p, int v, long len);


    int mlockall(int flags);


    int msync(Pointer p, NativeLong length, int flags);
}
通过调用mlock可以将进程使用的部分或者全部的地址空间锁定在物理内存中,防止其被交换到swap空间。对时间敏感的应用会希望全部使用物理内存,提高数据访问和操作的效率。例如,memcached就提供锁定内存的选项,保证memcached使用内存全部在物理内存中。
通过mlock锁定对应的地址空间,防止被swap出去,这样的效果 ,也正是RocketMQ所需要的。
0 条评论